


Ben Cochran
Forum Replies Created
-
AuthorPosts
-
 Ben CochranMember
Aaron, I have the 70-200VR and have been using it for a good while. It is an awesome lens! I, personally am not a fan of the expansion tubes/teleconverters and would recommend going the route of the 80-400VR, if you want that range. It too is an awesome lens, once the photographer learns to over come its handicaps. However, the 70-200VR is much easier to use, has the the better second generation of VR and does deliver very crisp images routinely.
I don’t use the VR that often but even when I do, I haven’t really noticed a huge difference in the decline of battery longevity, with my cameras. I don’t know how much you shoot but I would still recommend extra batteries, nonetheless.
Ben CochranMemberJay, the advice that you are going to get will vary a good bit and mine is but just another piece of advice that is formed from my own opinion and experience. Before you go the kit route, remember that you do get what you pay for and will have to pay again for those things that do not have a long life or are up to the quality of your future needs. The equipment (Vice, Bobbins, Hackle plier and so forth) are very important tolls that you will want to be good enough to last you for 10’s of years. The materials are the window dressings and the rest is up to your skills, as they evolve. I would strongly recommend that you not cut the corner on the vice and tools as they allow you to apply the window dressings better and alow you to maximize your evolving skills.
There are many Vices on the market and my suggestion will be based on my own experiences with other companies, be that quality of their product and the relationships in the customer service dept. I really like the design, quality of build and materials used in the build as well as the outstanding customer service and/or support of Griffin Enterprises. They have some new models out now that are simply outstanding and the prices are perhaps the best deals on the market place, when compared to similar products. I posted a pic of the newer Griffin Mongose Vice in the Photography forum here under Zachs thread “White Stage Flies”. The Vice is outstanding and a great deal fro what you get,it also comes with a carrying case and some extra tools. You can view these vices at griffinenterprisesinc.com under the Vices tab. They also have other tying tools that are listed there and it is of very good quality.
As far as material, you would be better off purchasing what you need for the type of flies that you plan to ty. This way you will be able to ty more of the patterns that you want to ty and not have a bunch of material that you may rarely use.
Ben CochranMemberZach, I know that you wanted to keep the post processing time limited but thought that I would throw this in for consideration. As David stated, a good white background makes it easier for the GA’s to remove the backgrounds or to just select the subject. The thought that I want to put out is this. I have noticed that the GA’s often remove the backgrounds and then rebuild the entire image, reason for this; it gives them better control over the final print and choice of back grounds or special effects. Adding shadow, post production, also gives more control on how clean that shadow will print.
CS3 really is great as they listened to the GA’s and added better tools for that application. With a crisp whit background, the “Magic Wand Tool” will quickly select all of that particular color. Granted it also will select some of the brighter sections on the subject but by selecting the “Quick Selection Tool” sized down to your needs and then going into the select folder and chose “Inverse”, you can go back over the area that you want to keep. Go back to the select folder and choose “feather at 2 or 3 and then go to the edit folder and chose copy, then paste. It automatically adds a new layer of just the subject for you. Turn off the background layer and above that layer, and below your new layer, you can ad fill layers or effects layers. Also, you can add one layer that is just a new shadow that you create and control, only the shadow is on it and the rest is transparent. Best part is, no splash or bleed which ends up in a clean commercial print.
It only took me 10 minutes to copy this image, as above, and another 10 minutes to make the background fill layers and shadow layer, including the spot light effect. This is the exact same image that I posted on this thread already, I performed the steps that I wrote out. Granted, if this was for commercial use, I would do a few things different and clean it a bit more but I wanted to share another approach that allows you to reuse backgrounds, change them or just keep cut images for later use.

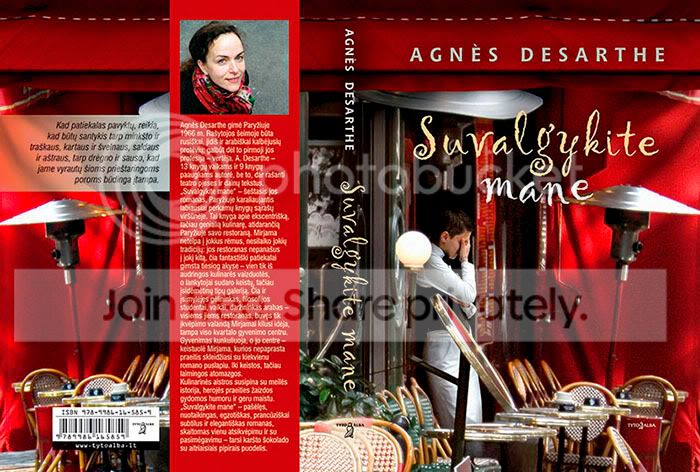
We all know the degradation effects of drastic down sizing too. so… lolBen CochranMemberThanks Zach, I am back in the states now, got back just a few weeks ago. Yes, that is Lithuanian and yes the lady (waitress) is added to the image but it isn’t really a clone process. The cafe scene is actually 2 separate shots that I did of a cafe in Paris and that poor woman was shot in Brussels at a completely different type of cafe.. Would love to see the look on her face when she saw that cover LOL.
Oh yes, the GA’s blow the images up like 1,000% so even at this magnification, you cannot tell that it isn’t true. Reinforces why they want large original files .
Ben CochranMemberDavid, that is funny and very true (Blunt force trauma) lmao… That is one of the things that I do have against the HDR automated process but some of the images do turn out brilliant, just a very few though. As you said, a lot of images are way to over processed as they appear as though they were processed with an attempt to make them believable. I personally feel that a lot of the images would of turned out better if the process would of just taken the image further into the artistic realm and forfeit the attempt of trying to make it look as though it were straight from the camera.
Vincent Versace put it best as “make the unbelievable, believable”. I think what he means by this is: The photographer knows the truth and/or original image and/or images. Meaning that the completed post edit should be done so that the viewer cannot tell if the image is out of camera or not. But, this also depends on the final application or use of the images and per client demands or needs.
One of the smartest things that I have done, in the aspect of professional photography, is to spend an enormous amount of time with the GA’s at one of the publishers that I do a lot of assignments for. I decided that my best avenue would to be a sponge and just listen to what they prefer and/need in the original images that they work on. I also soaked up their workflows and processes, from this I learned how to shoot for the GA’s. There really was a big difference from everything that I had read and learned about photography, as the GA’s really do need to have the shots done in a very particular way for the final images that they are working towards. As they explained to me: “ A lot of the professional photographers do not know how we need to process the images, which is why we require them to send us unprocessed RAW images. Their enhancements are more often new problems that we have to overcome or these simple enhancements limit the quality of the original data that we need to process our way so that the final image appears the way we want it done and need it done. Few professional photographers know the requirements of CMYK processing as we need it done for a particular commercial printing service or how the images are effected by the particular paper that we use and/or chose.”
Another important fact that I learned from the GA’s is that the mass majority of GA’s use Photoshop and not many are using the third party plugins. This particular publisher has a separate studio, across the street, for the GA’s. As I said, I spent a lot of time with them and ended up in a great relationship with one of them. She is also the art director but we were able to keep the professional work separate from the relationship. They actually placed a new desk for me in the studio and let me do all of my own post processing with them and watch and learn how they do their work. Once I changed my shooting style to that of shooting for the GA’s, I began to get a lot more assignments from the publishing director as they noticed a much faster turn around time from the GA’s when I was the contracted photographer; not to put a feather in my hat but the completed images were also better and more inline with the need of the assignment. The reason that I share all of this is to better validate this information as not my own but straight from the GA’s wish’s and desires from photographers.
They prefer the RAW images for the reasons that I described above. However, by learning their requirements and needs, I would shoot the assignments as explained and duplicate the artistic wish list of drawings that they provided. While doing this, I would also add in some of my own compositions and then we would go over the contact sheets together. I found that they really do like original compositions that they did not think of but their planned shots had better be in the mix as well. Many of my own compositions did make the final but again, they were not processed at all: This is very important as again they need to have all of the data tools to process the image the way that they need it to be done. After watching and learning all of the processes and requirements that are truly printing demands placed on them, I began to also submit some of my own graphic design work with the finals that they selected. As Zach mentioned, I would submit these in TIFF format but I made sure that all of the layers were named and present, just in case they needed to work on any one particular layer. I knew and learned that if I used a third party plugin, they would not be able to work on that layer at all and would have to go back to scratch and try to duplicate what I had done; this does not make GA’s happy lol.
A good number of completed and published images are not from just one photograph or sections of an image are removed with an artistic masking layer added, as though it is part of the original photograph. This is one thing that I consider to be very valuable for shooting for publication. I now shoot a lot of archive shots: What I mean by this is, I shoot for backgrounds and then shoot different subjects with the idea in mind that the images can fill the needs of an assignment, once processed and merged correctly. Again, I go back to the comment by Versace, make it believable. One of the images that I am most proud of is a merged process and post edit of 3 separate images. I think that it is believable but only you can tell me if I pulled it off or not. The assignment was explained to me and I shot the shots that they wanted. When I turned in the RAW images, I also attached an original composition and processed TIFF, with all of the named layers. Winning the lottery would probably mean less to me but my composition and completed GA work was the final used on the attached book cover. Granted, they did have to touch up some of it but I learned more from that too and to my joy, it was very little that they had to do.
This is a copy of the final document as sent to the publisher and printer. The shot of the lady (edited: waitress, not the shot of the Author) was taken in Brussels and the shot of the café was shot in Paris. Even though they are that far apart, they are both my images and are both photographs so in my mind, isn’t the perception of one photograph the most important? I know that it pays and in the realm of professional photography, it seems that this one thing would be more important as the truth is; it still required “3” good photographs taken a particular way. (Edit: Resized and unfortunately converted from CMYK to SRGB)
The point that I really want to make is: Photoshop is essential and third party plugins can be the end of an assignment. Images and processing must be done for the GA’s and it is from them that we must learn how to post process and not from other photographers. Of course, for non-publication assignments and for independent noncommercial sells, everything that I just wrote holds little to no merit. Also, this is all just my own experiences and not something that is written in stone.
I like some of these new processes and I really like your image Zach. I thought that was frost or snow on the trees and that made me like the image even more. Goes back to what Versace said again, I would not of known that it was a flaw until you told me [ch9786]
Ben CochranMemberZach, I wrote this out once and for some reason it didn’t post ..ARRGGGGG ;D If you have CS3; reselect the masking layer that has the image of the flyfisher in it only. Once this is done, open “select” folder and scroll down to “Refine Edge”. In there, chose contract and feather at 3, press enter. With the image still selected, select the eraser tool and remove the halo around the subject. Once that is done: Duplicate the background layer and then duplicate the masking layer that has the flyfisher in it. Select these 2 new layers and merge them, then place this layer under the masking layer that has only the flyfisher in it. Select the masking layer, that only has the flyfisher in it, and reselect the subject with the outllne of it (you can also put the curser on the icon and press ctrl and enter once to reselect). Once the subject is selected (outlined) again, click onto that new layer that you just merged, it should still have the flyfisher outlined. Reopen the “Select” folder and scroll “inverse”, then go back and open “Refine Edge” again. This time slide over to the “expand” side and then set the “feather, contrast and smoothness until the edges look more natural again. Remember to turn off the masking layer that only has the flyfisher in it as it is setting on top of the layer that you just worked on and will cover it.
Hope that helps and hope that it made sense 🙂
I personally like these images and it is the direction that photography is going in, especially for commercial photography. I personally prefer the Exposure blending techniques as they really do help to make the images pop but also help to get much closer to what the eye sees. IMHO, the future of professional photography is in the software and how well one uses it or how great their personal graphic designers are. Don’t get me wrong, a great photograph must still be captured first but it is the digital darkroom that bakes the pastries 🙂
Ben CochranMemberI agree with what David said but I won’t try to answer for him ;). Lowes has 4′ long fold-out tables, made by rubbermaid, that are very sturdy and work great. I use them to help prevent unwanted splash, on to the subject, possible lens flare and so that I can get better fill light across the backdrop. The price on these tables is about $35.00, I think it was.
Zach, I was thinking about this: I really like the direction that you are going but I noticed that you are now, basically, using only bounce flash. This makes me wonder if you need to use those soft boxes at all and at most, might only need to use the defuser on the hotshoe strobs. Also, with more distance to the backdrop, the wider the area of coverage and higher intensity that you can set the background strobe, while keeping your key light defused and lower as it is bounced off of the white boards. Just a thought…
Ben CochranMemberZach, where did you get that roll of paper from? I like those home made soft boxes too. Guess it would be easy to make the heads larger and line them with something reflective, did you try that as well and if so, how did it work?
Ben CochranMemberThats the ticket 🙂 Nice images Zach! your images illustrate why I, personally, don’t care all that much for light boxes. You did a very good job of capturing the white Deer hair against the whit background too!!
Ben CochranMemberI received 2 new vices in the mail today and decided to shoot one of them tonight. This was taken with the lighting set up that I described earlier.. Please feel free to critique as that is very welcome as well.
 Ben CochranMember
Yes John, I believe that it is… Thanks, I didn’t think about that 😉
Another side note: when using flash; a slow shutter speed may cause everything in the image to be over exposed and extremely saturated. Outside of additional strobes, Davids suggestions are best. Placing the product on white glossy foam board serves as a good reflector from beneath the product as well as the redirecting of side light from bounce boards, as David suggested.
Ben CochranMemberI won’t pretend that this is a great shot but this is a test shot that I did with just 2 R200’s. I wanted to see how it would blend with a completely different light source in the frame. This isn’t a best example as I purposely shot this at ISO1600. For some reason, the D200 seems to shoot better at ISO1600 than it does at 1000 or 1250.. Odd but I like odd? 🙂
 Ben CochranMember
But aren’t the slaves triggered by flash? The SU800 also works up to 66′ away, much like the pocket wizards but everything is built into the flash’s already. What I also like about the R200’s is the fact that I can move them around the ring, on the end of my lens, which gives me far more control over positioning the direction of the on camera lighting.
Ben CochranMemberSorry, I missed your last post while writing mine LOL. I see that you got your answers though.. One thing to remember though.. You can also use the SU 800 to trigger your SB600’s on location shoots and not be limited to just bugs. Think of it like also being able to turn your SB600’s into a remote, portable location lights. I used this type of setup for the location shots that I did in Lithuania last month. As a future thought, you can mount these with umbrellas and stands and soft boxes. What I am getting at is the fact that the SU800 opens the door to a sophisticated remote lighting studio. With the 2R200’s you can also have the small item production shots that you want, as well as great macro photography lighting. I know that it cost a bit more but I can definitely vouch for the fact that it has been worth far more than the money spent for me. Also, more SB600’s will also serve you well and then you will only need the SU800. The SU800 IS very easy to leaRN and get used to as well:)
Ben CochranMemberThis is the metadata for the shot that I posted in the thread “Help on taking better close up pictures”; 1/80 f40 ISO 400. And I had the flashes turned down from 1/8 and less. It is not meant to be an artsy shot as it is part of a tutorial but the metadata gives you an idea of just how versatile it is. The flash also helps to freeze everything in the image which gives better focus as well.. I did the tying book shoot with constant light the first 2 times and due to that, I am now getting the result that I wanted, this third time and with all of these strobes. I know your frustration 🙂
Ben CochranMemberZach,
I know that this is no where near what you were asking about but thought that I wold throw in another option for you, nonetheless. Have you considered the Nikon Sb-R200 strobes, better yet; the Nikon R1C1 system? Not only are they great for macro photography, they are perfect for small item production shots. I know that the cost is more than what you wanted to spend but the kit also comes with the SU800 wireless transmitter that does trigger the 2 200’s plus your SB600’s. The Su 800 gives you 3 channels that allows complete control over the intensity of the light from the strobes that are assigned to one of the three channels. They come with stands but there is also an attachment that allows you to place up to 8 R200’s onto the very end of the lens. I am in the process of wrapping up a tying book, with about 500 images and used this system with a lot of joy from the amount of work that was limited in post production, due to this system. As an example: I assigned 2 R200’s to channel A, 2 to channel B and then 2 SB800’s to channel C. All of the lights fire at the same time but I was able to control each of the outputs directly from the SU 800 and not have to change any of the strobes independently. You can also use it on your location shots and be able to get the flash out of the hotshoe.
Yes, it cost more but I have no doubt that you will get a lot more from all of this and knowing you, it will pay for itself in no time at all. Also, the light is all balanced and ambient light is no problem at all as these are strobes. I really do love this system and the versatility of it!
Ben CochranMemberI agree with the lighting and lens comments above. Might add that flash/strobe help to freeze subjects and will aid in the focus details. If you choose to go this route, less ambient light is very important. Grey cards are GREAT for WB, as mentioned.
I know this may seem a bit overboard but I shot these test shots with the Nikon 105mm 2.8 VR macro and several strobes.
1/80 f40 ISO400

1/250 f20 ISO125
 Ben CochranMember
Very sweet photographs there John, your attention to camera settings and image detail are to be appreciated and admired.
Ben CochranMemberChad, I really like the 1st flyfishing image a lot! As well as the first image that you have in the “Pets” section. Very curious to know if it is a 3rd party plugin that you used for it and what it is as I think it gives a great feel to the image and you really did a great job of using in your very appealing composition, Great job on these 2 images!!!
Ben CochranMemberThanks Matt! I hope that my comments did not come across wrong. I agree that the HDR can create some truly incredible images and yes, some amazing photographic art. This method has really caught on and in a lot of cases the images would probably of turned out better closer to the original. I think that your shot was a good call for an HDR but I also feel that it is more worthy of a non automated platform. One of the fall backs of a fully automated work flow is that it was established and written for a sampling of images and it just doesn’t fit all. One thing that really helps, with the automated process, is to then lay a darker or lighter, as needed, original image on top of the HDR image and then adjust the opacity to better blend the shadows and highlights. Masking Layers really help a lot as you have the leverage of using many more tools but it can get very complicated, although I strongly support learning and using the advanced tools for better work flow and final results. A levels adjustment layer is a good ending for the HDR workflow, stacked on the top layer…
Have fun with it and never stop allowing yourself to be WOWed by your own creations. About all of the tear sheets and professional books are full of processed images and the truth of the matter is, they are what sells and more than just pay the bills 🙂 Amateur or professional, the passion is the same and it is all art; be they treasured moments captured or part of a professional book: All facets of photography is art. treasure…
-
AuthorPosts