


Chromasia
Blog › Forums › Photography › Chromasia
- This topic has 35 replies, 13 voices, and was last updated Mar 14, 2008 at 10:48 pm by
Aaron Otto.
-
AuthorPosts
-
Feb 20, 2008 at 6:35 pm #62685
Mike Anderson
MemberGave up photoshop and illustrator on version 7 and 10… I just shoot it in raw and process it in lightroom as I’d process in a dark-room… every once in a blue moon I’ll put it in PS to burn or dodge a BW.. but that’s it… I found myself focusing on what I could do in the application more than what I should be doing in the field…
Absolutely! As I struggle to learn this hobby I’ve decided that I hate post-processing images on a PC. Its way too time consuming and time is always in short supply with a real job, a side job, a dog, two kids and a wife, a golf, photography, and fishing addiction, and a website. I may never equal what some of you PS masters can do but I’m ok with that. Maybe someday I’ll get better at seeing what my camera sees and make the adjustments in the field.
Feb 20, 2008 at 6:55 pm #62686 Ben CochranMember
David, that is funny and very true (Blunt force trauma) lmao… That is one of the things that I do have against the HDR automated process but some of the images do turn out brilliant, just a very few though. As you said, a lot of images are way to over processed as they appear as though they were processed with an attempt to make them believable. I personally feel that a lot of the images would of turned out better if the process would of just taken the image further into the artistic realm and forfeit the attempt of trying to make it look as though it were straight from the camera.
Vincent Versace put it best as “make the unbelievable, believable”. I think what he means by this is: The photographer knows the truth and/or original image and/or images. Meaning that the completed post edit should be done so that the viewer cannot tell if the image is out of camera or not. But, this also depends on the final application or use of the images and per client demands or needs.
One of the smartest things that I have done, in the aspect of professional photography, is to spend an enormous amount of time with the GA’s at one of the publishers that I do a lot of assignments for. I decided that my best avenue would to be a sponge and just listen to what they prefer and/need in the original images that they work on. I also soaked up their workflows and processes, from this I learned how to shoot for the GA’s. There really was a big difference from everything that I had read and learned about photography, as the GA’s really do need to have the shots done in a very particular way for the final images that they are working towards. As they explained to me: “ A lot of the professional photographers do not know how we need to process the images, which is why we require them to send us unprocessed RAW images. Their enhancements are more often new problems that we have to overcome or these simple enhancements limit the quality of the original data that we need to process our way so that the final image appears the way we want it done and need it done. Few professional photographers know the requirements of CMYK processing as we need it done for a particular commercial printing service or how the images are effected by the particular paper that we use and/or chose.”
Another important fact that I learned from the GA’s is that the mass majority of GA’s use Photoshop and not many are using the third party plugins. This particular publisher has a separate studio, across the street, for the GA’s. As I said, I spent a lot of time with them and ended up in a great relationship with one of them. She is also the art director but we were able to keep the professional work separate from the relationship. They actually placed a new desk for me in the studio and let me do all of my own post processing with them and watch and learn how they do their work. Once I changed my shooting style to that of shooting for the GA’s, I began to get a lot more assignments from the publishing director as they noticed a much faster turn around time from the GA’s when I was the contracted photographer; not to put a feather in my hat but the completed images were also better and more inline with the need of the assignment. The reason that I share all of this is to better validate this information as not my own but straight from the GA’s wish’s and desires from photographers.
They prefer the RAW images for the reasons that I described above. However, by learning their requirements and needs, I would shoot the assignments as explained and duplicate the artistic wish list of drawings that they provided. While doing this, I would also add in some of my own compositions and then we would go over the contact sheets together. I found that they really do like original compositions that they did not think of but their planned shots had better be in the mix as well. Many of my own compositions did make the final but again, they were not processed at all: This is very important as again they need to have all of the data tools to process the image the way that they need it to be done. After watching and learning all of the processes and requirements that are truly printing demands placed on them, I began to also submit some of my own graphic design work with the finals that they selected. As Zach mentioned, I would submit these in TIFF format but I made sure that all of the layers were named and present, just in case they needed to work on any one particular layer. I knew and learned that if I used a third party plugin, they would not be able to work on that layer at all and would have to go back to scratch and try to duplicate what I had done; this does not make GA’s happy lol.
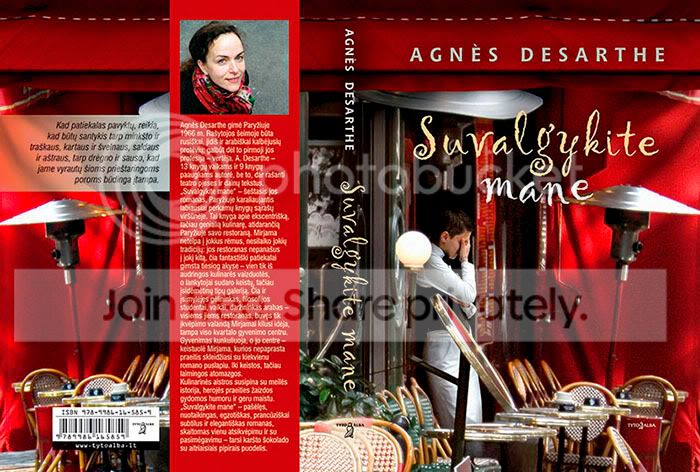
A good number of completed and published images are not from just one photograph or sections of an image are removed with an artistic masking layer added, as though it is part of the original photograph. This is one thing that I consider to be very valuable for shooting for publication. I now shoot a lot of archive shots: What I mean by this is, I shoot for backgrounds and then shoot different subjects with the idea in mind that the images can fill the needs of an assignment, once processed and merged correctly. Again, I go back to the comment by Versace, make it believable. One of the images that I am most proud of is a merged process and post edit of 3 separate images. I think that it is believable but only you can tell me if I pulled it off or not. The assignment was explained to me and I shot the shots that they wanted. When I turned in the RAW images, I also attached an original composition and processed TIFF, with all of the named layers. Winning the lottery would probably mean less to me but my composition and completed GA work was the final used on the attached book cover. Granted, they did have to touch up some of it but I learned more from that too and to my joy, it was very little that they had to do.
This is a copy of the final document as sent to the publisher and printer. The shot of the lady (edited: waitress, not the shot of the Author) was taken in Brussels and the shot of the café was shot in Paris. Even though they are that far apart, they are both my images and are both photographs so in my mind, isn’t the perception of one photograph the most important? I know that it pays and in the realm of professional photography, it seems that this one thing would be more important as the truth is; it still required “3” good photographs taken a particular way. (Edit: Resized and unfortunately converted from CMYK to SRGB)
The point that I really want to make is: Photoshop is essential and third party plugins can be the end of an assignment. Images and processing must be done for the GA’s and it is from them that we must learn how to post process and not from other photographers. Of course, for non-publication assignments and for independent noncommercial sells, everything that I just wrote holds little to no merit. Also, this is all just my own experiences and not something that is written in stone.
I like some of these new processes and I really like your image Zach. I thought that was frost or snow on the trees and that made me like the image even more. Goes back to what Versace said again, I would not of known that it was a flaw until you told me [ch9786]
Feb 20, 2008 at 7:06 pm #62687Zach Matthews
The Itinerant AnglerBen, dude, what language is that jacket in?
Feb 20, 2008 at 7:16 pm #62688Ben CochranMemberThanks Zach, I am back in the states now, got back just a few weeks ago. Yes, that is Lithuanian and yes the lady (waitress) is added to the image but it isn’t really a clone process. The cafe scene is actually 2 separate shots that I did of a cafe in Paris and that poor woman was shot in Brussels at a completely different type of cafe.. Would love to see the look on her face when she saw that cover LOL.
Oh yes, the GA’s blow the images up like 1,000% so even at this magnification, you cannot tell that it isn’t true. Reinforces why they want large original files .
Feb 21, 2008 at 3:11 am #62689david king
MemberBen I think your point about learning from Graphic Artist and Art Directors is a good one. I have done mostly advertising photography and a little bit of everything else. It is a whole different world from the photography for its own sake world. It pays well though when you can get them to pay at all.
Mar 14, 2008 at 4:26 am #62690kevin powell
MemberChromasia is a good standard… amazing photo blog.
About RAW… it goes both ways now. I loved the RAW files but it is real slow for the Photographer and the files can be huge and most cameras will save both ways. CS3 has fixed that and it will open RGB JPEGs and TIFs in Camera RAW. So either way. Those folks asking for RAW files will start taking just about anything.
Correct to the eye in Camera RAW… then Correct curves to the numbers (white, mid, black tones) in Photoshop, Unsharp mask the channels (doing the separate channels… a different world) that make it pop. and you are Golden.
Convert it to Lab and mess with those channels. Another world starts happening… The Luminance channel is the only way to fix many photos…
Mar 14, 2008 at 4:56 am #62691Aaron Otto
MemberJust read this whole post.
Mar 14, 2008 at 11:55 am #62692Memberfor what you mentioned a simple action is all you need to do. It is as easy as recording to tape… No scripting, no code.
Look up actions in the help menu or just let me know and I’ll send you one of my little training tutorials
Mar 14, 2008 at 11:56 am #62693The Itinerant AnglerKevin –
I’ve read a lot of stuff about Photoshop but I’ve never heard of the ability to apply unsharp mask to different color channels.
Mar 14, 2008 at 1:38 pm #62694MemberPretty simple really. The channels panel is basically the same as your layers panel except you are working the individual color . Select the channels pallet and select the channel you want and do your sharpening.
TIP… You can select whatever area you want and only do it to that area for better results.
With offset printing, we’ll hit the black channel quite often just to make the photo have a crispness about it.
You can Blur your channels the same way to get some great feel to your photo. Select the background and just soften a channel.
I mentioned Lab color at some point. Switch from RGB to Lab and Sharpen the L channel to get some cool results then go back to RGB.
Photoshop is a crazy tool and if you ever here someone say they are proficient in the program… they are probably only fishing dry flies (there is a whole nother world sub surface) I have been using Photoshop for right at 20 years now and It still makes me feel clueless about how to use it. But that is why I Fly fish and do Design.
-kp
Mar 14, 2008 at 3:54 pm #62695MemberExample of photoshop and how you can change things for the feel of an article.
Mar 14, 2008 at 3:56 pm #62696Ben CochranMemberKevin, I don’t know if you have been posting on this section of the forum, if you have I missed it. Nonetheless, I want to express how glad I am to see you posting over here as well. It is great to have a Graphic Designer adding to these great threads, that we have been having lately. You a so correct in that most only know the surface of PS and there is a very deep ocean underneath the surface that most fish around in. Channels are so cool and really make some of the other heavily used tools close to obsolete. Through the process of learning, in my early process of learning by watching graphic designer’s use channels for painting the process of sharpening and cloning, without using the unmask sharpen or smart sharpen tools or clone brush, it blew my mind away. You can correct me if I am wrong on this but from what I have learned or am learning, one really doesn’t need any of the third party plugins as they can all be created in either channels or vectors; just takes more time. I am really looking forward to your participation in some of our discussions over here, as I firmly believe that the future of a photographer and/or photography is in the knowledge and/or capabilities of same in the new era of digital darkroom.
Aaron, think of a photographer much like a racecar driver. It isn’t how fast you drive as much as it is how you know the best practices of getting the most out of your car at peak performance. Over the many laps that you run, the driver that best uses the efficiencies of his tool, have the greatest likely hood of winning the race, or at least placing. The question now would be, how many races would a driver win with automatic transmission. Even film processing was dependent upon the quality of the darkroom but both digital and film required a great image capture to start with. It is not cheating as if it were, all film photographers would of used the same film and chemicals. Great images take far to much time to try and create and even at that, it is very unlikely that they will morph into a great image. Rarely is an out of the camera shot as amazing as it can be and it is far from consistent. If it were cheating, then the processors inside of all digital cameras would have to be removed. If you don’t mind my saying this, you have to be willing to commit to the time but you don’t have to become a graphic designer. I would never recommend any of the automated enhancement tools as you are giving up data and image control that you may not want to loose especially if you want to become a professional photographer. It is more important to capture a great image first and then using the software properly to really make it pop. Remember that for print, there are many levels that have to be done correctly because a great image can print terribly. (edited: I am talking about enhancements and resizing. Question; What would you do if you created a great image but then found out that your file was way to small?)
Mar 14, 2008 at 3:59 pm #62697MemberI use smart sharpen>lens blur as the final step at reproduction size on the Luminance channel in LAB mode. Then back to RGB Russell Brown has a good tutorial here on sharpening. http://www.russellbrown.com/tips_tech.html
Mar 14, 2008 at 5:53 pm #62698 Chad SimcoxMember
You can Blur your channels the same way to get some great feel to your photo. Select the background and just soften a channel.
Photoshop is a crazy tool and if you ever here someone say they are proficient in the program… they are probably only fishing dry flies (there is a whole nother world sub surface) I have been using Photoshop for right at 20 years now and It still makes me feel clueless about how to use it. But that is why I Fly fish and do Design.
-kp
I’ve never really jumped into the world of editing the channels of my photos. Maybe a sharpening here or there, but thats about it. Most of the time I work with the channel mixer or curves and work on individual channels that way. Have you found that those tools work the same as doing the work within the channels pallet?
A few years ago, another editor was telling me about how every hip hop music video that goes through the doors at their post house usually gets a slight blur to the red channel in the online finishing room. This gives that slight cross process cyan look to it.
http://society6.com/grainfarmer Fly Fishing and Landscape open edition Photography prints.
http://grainfarmer.vsco.co/ iPhone photos
http://instagram.com/chad_simcox InstagramMar 14, 2008 at 6:36 pm #62699MemberExact same and it is all about “Effects” or changing the feel. AND IT IS ABOUT PLAYING WITH THE IDEAs more than just the image.
When you break away from basic color correction into the world of channels, masks, layers and so on. My biggest suggestion is to keep the original layer in tact and experiment.
On that note. I also go by a rule of keeping it simple and try to make it look like the photo was shot that way. If it looks like a photoshop bastardization it probably is.
Check the books out from this group http://www.kelbytraining.com/. Great info
Mar 14, 2008 at 10:48 pm #62700MemberThanks Ben I’ll keep your thoughts in mind.
-
AuthorPosts
- You must be logged in to reply to this topic.