


Braided worms
- This topic has 26 replies, 11 voices, and was last updated Oct 8, 2010 at 6:16 pm by
Rob Snowhite.
-
AuthorPosts
-
Jan 9, 2009 at 2:44 am #6656
Neal Osborn
Member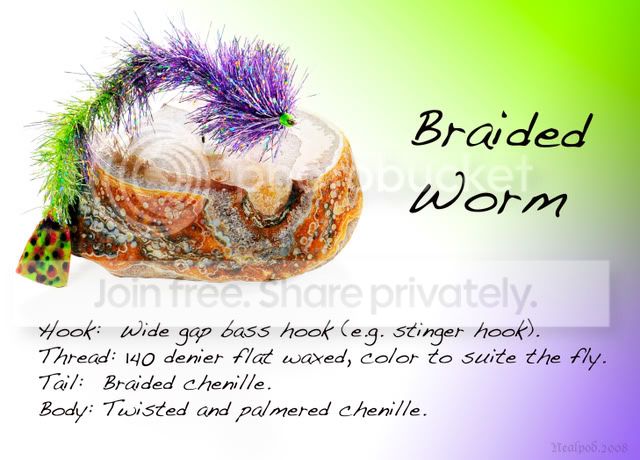
Tying braided worms is easy, inexpensive and a lot of fun. These flies are effective on lakes or streams. You can fish them lots of ways but it is most effectively fished on a sinking line and retrieved with short pulse-style quick strips. On rivers, I consider these to be the “poor-man’s” sex dungeon because they have a similar life-like action. The advantage is that you tie up many of these to fill a box in all sizes and colors. If you add a foam triangle at the tail you have a Gulley Worm (do a Google search on John Gulley from Arkansas who invented this pattern).
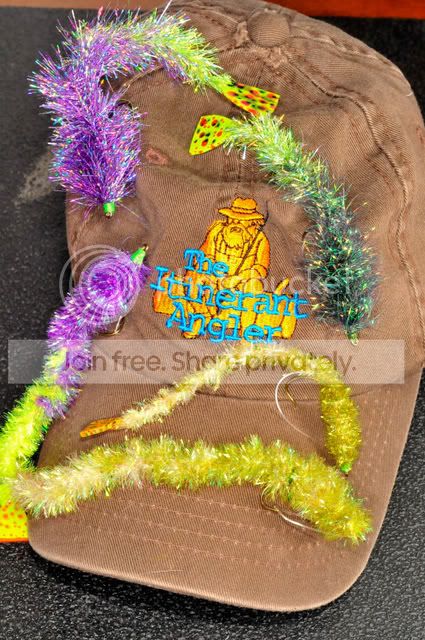
Basics: braided worms only require one material – chenille. However, the kind you choose is very important. There are many kinds including standard or sparkle but what you want is the pre-braided ice chenille or pearl chenille or Estaz. My personal favorite is the “Tri Lobal Fiber” chenille with either crystal or holographic blended at 1 1/4″ – this is also known as Crystal Tri-lobal Hackle or pseudo hackle. You can get this stuff at any fly shop or online – it’s not rocket science. If you use these sparkle/Estaz chenille’s the advantage is you fly will turn out weightless and they shed water immediately upon picking up the fly for the back cast. Thus, you can create a big profile while being able to manageably cast the fly with a 5-6 wt rod. However, nothing beats an 8-wt rod for the bigger worms on sinking lines.
Here are some examples of chenille variants (I typically use the kinds shown on the right).

I never add weight to these flies because that negates the natural movement they give in the water. Stick with sinking lines to pull the fly down. These aren’t jigs.
Hook: Wide gap bass hook (e.g. stinger hook).
Thread: 140 denier flat waxed, color to suite the fly.
Tail: braided chenille.
Body: wrapped chenille, same as that used for the tail.Wrap a thread base

Cut three separate strands. Measure twice the length as you want the tail length to be at the end. For longer tails, cut longer strands. Be generous here, you can always cut off the excess later.

I add some hard mason mono 20lb test for a weed guard but this is optional. If you are a beginner tier you can skip this step.

Tie in the three strands at the bend of the hook in the center of the length. Then twist the front three strands together. Note: You can “fuzzle” these flies at this point which I have found to be a very cool effect (the fuzzle technique was discussed earlier on this board here http://www.itinerantangler.com/cgi-bin/board/YaBB.pl?num=1200783692/4#4 )


Apply lacquer (Sally Hansen HAN) to the hook (very important for later stability) and then palmar wrap the chenille cord to the front behind the eye making sure to leave a good eye length gap so you can finish the fly without crowding the eye. In this series I purposely ran out of chenille to emphasize the importance of cutting enough length at the start. If you run out of chenille just tie off and more strands to complete the fly but make sure to add three strands and twist again or the fly won’t look uniform.


Now you just braid the three tail tag ends together. If you don’t know how to braid . . . go ask the neighbor girls.
It’s kinda hard to photograph the braiding process but you end up with something like this. When you get the end of your tags you secure them by tying off with 5x mono or any tippet material you have around. Tie 3 or 4 overhand knots just to secure the tags and then trim off BELOW the tie in point being careful not to cut your knot. Then place a dab of super glue on the knot and the shaggy remaining tags and it will be set for life or until a big fish chews it up.

If you choose to add a hard mason weed guard this is what it will look like.

Have fun!
 Jan 9, 2009 at 4:57 am #58214
 Cameron MortensonMember
Neal…you tie some KILLER patterns.
Jan 9, 2009 at 12:14 pm #58215Andrew Wright
MemberGreat pattern Neal. Thanks for posting. I am going to have to tie a few to have in my box when the bass fishing heats back up. How do you tie in the the foam triangle?
Jan 9, 2009 at 2:56 pm #58216MemberThanks Andrew – I can’t wait to have you try these out on that bass pond you have access to.
Jan 9, 2009 at 4:06 pm #58217MemberThanks Neal. Let me know when you want get out there. I think this pattern definitely deserves a workout on the old bass pond.
Jan 9, 2009 at 6:33 pm #58218keith b
MemberIf you guys need an additional tester please let me know. I would love to come throw some of these with you guys. If I were able to catch fish with them then you could taut them as fool proof. ::)
Jan 9, 2009 at 7:41 pm #58219Rob Snowhite
Memberi’ve tied mine with a weighted head which makes the thing look all sorts of lively in the water. all three fell apart on the first day out with them. i’ll use some binding agent as you suggest.
how did you get one that is half one color and half another?
Jan 9, 2009 at 7:48 pm #58220 Mike McKeownMember
Killer pattern Neal, love it…
Jan 9, 2009 at 8:17 pm #58221MemberAh, Rob you caught me! I was hoping to skip by without explaining
Jan 9, 2009 at 8:29 pm #58222Rich Kovars
MemberWhat are you using for the tails?
Jan 9, 2009 at 9:22 pm #58223MemberMy tails are just chartreuse (lime green from the craft store) foam sheets, cut in a triangle, then dotted with permanent markers in a mixed speckled pattern.
Jan 21, 2009 at 12:19 am #58224 Eric WellerMember
Neal,
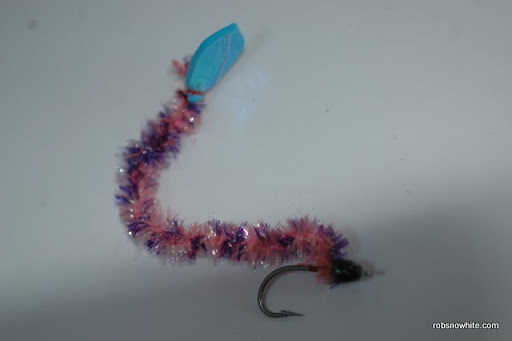
Jan 23, 2009 at 3:41 pm #58225MemberI tied up a couple purple/pink ones for a custom order
I tie mine in right behind the cone head and use metallic/mylar foam for the bit on the tail.I’ll try to get pics up to share (with my new camera *snap) this weekend.
Jan 24, 2009 at 10:52 pm #58226Member
and
 Sep 25, 2010 at 12:25 am #58227Member
I could not find these with the search feature, but after some clicking I found them.
I just found a great use for these worms, and it should make my shoalie fishing a lot more fun with the fly rod! 😉Neal, or anyone that has used them, what kind of action do you get in the water with these? I am thinking about one without the foam tail for more snake like action.
Keith
Sep 25, 2010 at 3:39 am #58228MemberKeith,
I just posted a reply over at NGTO regarding the Shoal Bass flies that are working best on the DH section.
As for the Gully Worm – it is certainly a killer pattern and I have fished it all summer with good results. Keep in mind that the foam tail is actually very important because it keeps the fly true in the horizontal position. When you strip the fly dives but the foam tail keeps it riding up and straight. Without the tail the fly does not look realistic.
Short quick strips = action similar to a standard worm. The difference is that you won’t be using lead weight on the head like in bass fishing. Therefore, you need to either use split shot or even better a sink tip line 😉
Also, I am now using a wire “V” weed guard instead of that silly little loop guard that just gets fouled up.
Green, chartreuse, brown, and black are the best colors. White is crap.
Sep 25, 2010 at 12:32 pm #58229MemberThanks Neal.
Sep 25, 2010 at 7:28 pm #58230Mike Anderson
MemberJust saw this. Great job Neal they look like Bass killers. I’ll give em a go here in TN as well.
Sep 25, 2010 at 8:01 pm #58231Abe Mathews
MemberI can tell you that these braided worms have been pretty deadly on bass in some of the Knoxville-area reservoirs.
Sep 25, 2010 at 11:28 pm #58232MemberThis guy is also super bad **s. LOL.
On a sinking tip line this fly will call all fish to it within seconds. I have no idea who invented it or what it is called but I bought 6 earlier this summer in chartreuse and black. I am still trying to work out the best method to fish it without getting snagged in moss. When it works it is a killer fly for bass.
-
AuthorPosts
- You must be logged in to reply to this topic.