






Onstream Macro Pics
Blog › Forums › Photography › Onstream Macro Pics
- This topic has 37 replies, 9 voices, and was last updated Nov 20, 2008 at 7:36 am by
Daryl Human.
-
AuthorPosts
-
Nov 14, 2008 at 2:34 am #65517
 Ben CochranMember
Thanks Neal 🙂
Hey, with that new patient, guess that means that you have to put a new category in your portfolio. Kind of an odds and ends file..
Nov 14, 2008 at 7:33 am #65518 Mike McKeownMember
Thanks Neal, great little article…
Nov 14, 2008 at 6:10 pm #65519Neal Osborn
MemberSome additional internet links on macro photography.
Here is a .pdf copy of a powerpoint presentation on macro photography. It is a great place to start your reading and the pictures are good quality. It is by the Central Maryland Photographers Guild, January 2008. http://www.cmpg.org/site/wp-content/uploads/2008/10/macro-photography-presentation.pdf
http://www.stayfocusedphotoclub.com/macro_photography.pdf
http://www.minnesotanature.org/Media/Macro.pdf
For the series techies in the group this .pdf is what you are looking for http://www.canonfd.com/macrobrochures/closeupengl82.pdf
The mother load of .pdfs on macro photography http://www.pdf-search-engine.com/macro-photography-pdf.html
A powerpoint (.pdf) presentation http://www.bwps.org/res/tips/macro/MacroNightFeb06.pdf
This is my next book purchase (I have heard good things about the author and the text) http://www.amazon.com/gp/product/0470118768?ie=UTF8&tag=marvelsphoto-20&linkCode=xm2&camp=1789&creativeASIN=0470118768
Nov 16, 2008 at 3:49 am #65520MemberHere are a few macro shots I took this morning while walking Chloe (the dog). Seriously, you can practice macro just about anywhere, including your own back yard. BTW, these are all taken with the camera handheld on a cloudy day with active rain/drizzle; just think what you can do under optimal or controlled conditions with a tripod and some extra gear. Warning – this stuff is addictive.
The more you practice around the house (preferably outside) and study your results the better equipped you will be once you get to the river.
Nov 16, 2008 at 4:46 am #65521Daryl Human
MemberNice stuff. I spent the weekend trying to soak up as much info as I can from your post. Seriously, there is some really good info in there.
Will see if I’ve been able to make any improvements later on this evening.
Nov 16, 2008 at 9:44 am #65522MemberOk, so I took a couple more. Would be good to know if there is any improvement, but bearing in mind, these were shot indoors.

 Nov 16, 2008 at 3:31 pm #65523Member
Daryl, congratulations on making the leap, now you are in the game. Instead of commenting on your pictures directly, I think it would be more beneficial to give you a list I made for self critique. That way you can better understand what specific advice you are after.
Preface: a long time ago a very wise professor gave me a list called the “Ten P’s” for assessing a patient in less than 60 seconds. I was just starting out on the clinics and was very inefficient at rounding on multiple patients each morning. What I needed was to quickly assess the status of a patient (i.e. sick or not sick) without getting caught up in all the technical aspects of his/her care. If you don’t know the basics you can’t make the appropriate adjustments. Then I learned the Ten P’s and now had a road map for quickly focusing in on my goals.
The 10 P’s: piss, poop, puke, pain, pharmacy, pillow, people, ping machine, psychiatric, predisposition.
“Good morning Mr. X how did you sleep last night? Any problems going to the bathroom? How is your pain? Did you get out of bed and walk around? Family been by to see you? Did the nurse adjust your medications (ping machine)? Do you think you’ll be ready to go home today?” To the nurse, “How is Mr. X? Any problems with his care? Pain controlled? Social work see him? Discharge plans going well? Any concerns?” And bam, within a few minutes you have a pretty good idea about the status of the patient and can make a focused decision about care for that day.
A while back I made a similar list for photography because I found myself needing a quick assessment checklist for my pictures. When starting out you don’t always know what questions to ask yourself in order to make adjustments. Furthermore, we often see wonderful pictures posted on the internet and want to create similar images ourselves but don’t know how to go about breaking down a shot into parts for examination. Like fly fishing, there is a lot going on – By knowing the basics you can better look at a scene and have at least a starting point on what fly to choose and what leader to use, the rest of time we are adjusting on the water as the day progresses.At first, it is common to shoot a bunch of pictures, load them on the computer and then stare aimlessly wondering if you like the result. However, if you have a checklist memorized, you can quickly hone in on what is wrong with a picture and either make adjustments or ask higher level questions of others to help you out. Instead of asking, “do you like this picture, what would you do differently?”, you can now say, “I am having trouble with the white balance in this picture and the composition seems wrong, I think I should have used f/10 instead of f/7, maybe a shorter focal length lens, what do you think?” By thinking in this way, you can produce better quality images in less time and become more efficient at post production (i.e. waste less of your valuable time).
Here is my checklist. Neal’s 10 C’s. I initially printed this out and carried a copy in my wallet. Now I just know it by heart and I “run the list” on every shot. This is my blueprint for making on camera adjustments during a shoot.
The 10 C’s
Commitment
Composition
Color
Conversation
Coverage
Contemplation (consideration)
Convergence
Categorization
Construction
CleanCommitment – Purpose of the shot – why am I taking this picture (assignment, personal, enjoyment, educational, or just posting on a certain internet blog site). This translates to my picture quality setting – am I going to use RAW vs jpeg, small, medium, or large size? Do I need to make it count or can I just snap the shot.
Composition – Where do you want to place the subject, rule of thirds vs breaking the rules, closeup vs in the distance, on the ground looking up vs in a tree looking down, etc. Are you trying to a cover shot for a certain fly fishing magazine ;), does the editor need space for typing? Then take a few shots and look at your display, do you like the composition, what could you adjust? Take another shot and so forth.
Color – Lighting (high noon, sidelight, backlight, all light). Are your shadows deep and harsh? Do you need fill flash? Look at the histogram, are there blown pixels? Is the white balance correct? Too purple, too orange? Also, beware of shadows!!! This is the point were I slow down and look at my shadows. Did I get the main subject but neglect to see that big monster shadow on the wall? How can I overcome that with flash or diffusers or snoots or other techniques to employ or learn for the next shot.
*in just the first three C’s you can adjust the settings to achieve about 60-70% of your intended goal.
Conversation – (story). What are you trying to convey by taking the picture? Did you achieve this goal? What can you change while still standing there? Example, did you intend to take a shot of someone landing a fish full of excitement but instead you used a wide angle zoom and the subject is only a small part of the picture and their face not in view? Or did you really want to get a macro shot of that Caddis pupae but instead captured the rocks, leaves and twigs as distraction from the story?
Coverage – Depth of field (background foreground) – How does the picture look, what is in focus what is out of focus. Did you want to have a dry fly in focus but the background artistically blurry but instead got a flat picture with everything in focus? How could you change your f stop to achieve this goal? Would another lens work better? Also, here is where I ask myself about the background, is it too dark and boring or do I need to add some flash to bring out colors for effect? (side note: ever notice those really great fly tying shots in magazines where the background appears to be all black or even slightly gradient? Ask yourself how they did that and how you can do it). Pause here and ask yourself about the background, does it work or does it need adjustment.
Contemplation (consideration) – Attention – where is the action. Take time to review and think about your shot. Did you replicate your mind’s eye?
Convergence – Focus. Is your picture sharp or soft? Zoom in on the picture with your camera’s display, look at the edges, are they in focus? Do you need a tripod? Do you need to secure the camera on a branch or wall or rock? Did yo get the shakes?
Categorization – What kind of picture did you take? Did you want a horizontal instead of landscape? Was it shot in the day but better suited for a night shot? Also, do you tend to overshoot certain categories (i.e. do you have like a hundred landscape shots of a river but only one close-up of the leaves?). Do you want to broaden your categories, maybe shoot some hands, feet, running water, more detail and less overview? This is an important category for me because I find that months later it is the unusual category shots of a trip that really catch my attention and if I forget to think about that while shooting I will undoubtedly pile up on the “usual” shots.
Construction – Framing and building. What is the foundation of the picture? Did you build a solid base or was it put together in a hurry and on the verge of collapse. In other words, does it have that “perfect” feel like you knew what you were doing or does it look like you pulled out the camera and prayed that you might get something good.
Clean – Simplify. Final step for me. I always finish by asking did I manage to make this shot a simple as possible. Did I remove unneeded background distraction? Did a dog walk in the background? Do I really need that tree limb in the shot? How could I make it even more simple?
Nov 16, 2008 at 6:13 pm #65524Mike McKeownMemberNeal, you have again opened my eyes, that is a great way of looking at making a photo.
Nov 16, 2008 at 7:06 pm #65525MemberThanks Neal!
How do they make the backgrounds black. I can see this done in a lab environment where I could shoot with a green or blue background and replace the color. But on stream, this is not always at my disposal.I’ve picked up a few things in my pics – using your list to analyze them, and had I had a your list before I posted them, they would not have gotten any “airtime”.
Thanks again for your advice and assistance!
Nov 16, 2008 at 8:20 pm #65526Morsie
MemberDaryl if you want the background in the image (which you generally don’t in a macro shot) then have it close to the subject, if you don’t want it to be a feature (preferred) then separate it from the subject by a foot or so, the very shallow depth of field in macro photography will just blur it right out of the image but the subject will be sharp and will pop out of the pic.
Morsie
Nov 16, 2008 at 9:04 pm #65527MemberHi Morsie,
I’m limited in terms of lens, as mine on goes down to F4, so if I am understanding this correctly, I will not be able to achieve that result with my 17-85mm EFS F4/5.6 on my DSLR? I am more likely to achieve a total “blur” with my P & S that goes down to f2.8? Hope I am understanding this correctly?
Daryl
Nov 16, 2008 at 10:24 pm #65528MemberDaryl, By removing the background you also remove the shadow the subject might throw onto the background. When shooting close-up just by moving the background even 30cms from the subject it will be a complete blur with no shadow regardless of lens and f stop.
Focus everything on the subject. As Dave Anderson told me (via Annie Liebowitz) “take care of the subject and let the background look after itself” – or words to that effect.
Morsie
Nov 16, 2008 at 11:56 pm #65529MemberOk, cool, I get what you are saying now. :-[
That simplifies it a whole lot ;DPS. Zach, where do I pay my membership fees?
Nov 17, 2008 at 3:07 am #65530MemberWhy not . . . let’s keep going. This is fun. I am way out of my league at this point but these are the kinds of things I wish someone would have told me when I started. Surely I am going to get things wrong so feel free to jump in with quips or quotes for commodius contemplation.
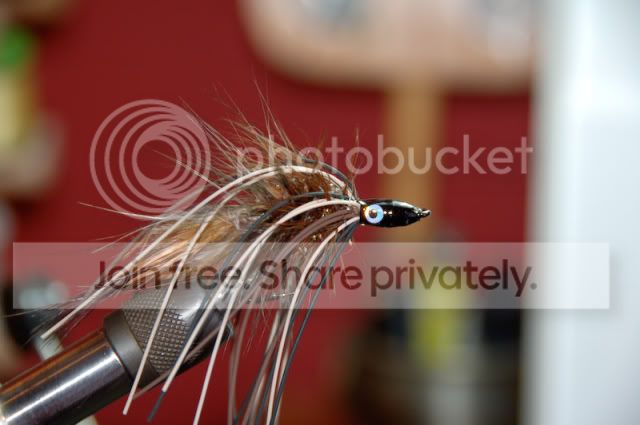
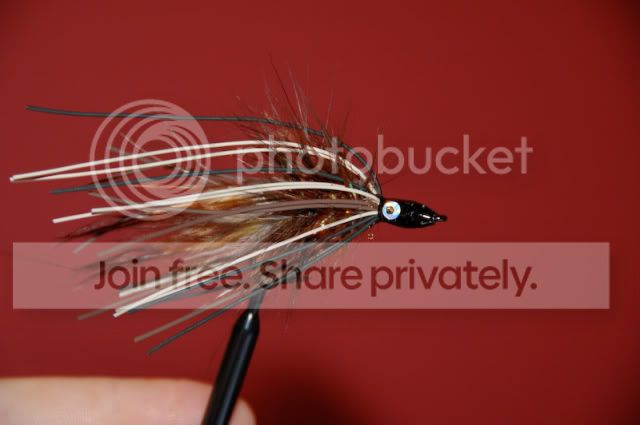
Backgrounds and depth of field in relation to macro photography. You can change the background three ways, 1) move it closer or further away, 2)bring it into or out of focus by changing depth of field (wider aperture = background blurred, smaller aperture = background more in focus), and 3)change the physical background with flash, either on- or off-camera (focus flash on the subject = background goes black, focus flash on the background and it becomes visible).
Examples vis-a-vis fly tying.
Shot of a calcasiu pig boat with the tying bench in the background. Nothing special, nice quick shot after tying.
Or you could simply add a red backdrop and get a bit more effect. Still nothing special because there is no creative use of flash and the background is only inches away from the subject.
Same quick-shot style but using a piece of wood in the background. Still no flash employed. These are all basic techniques you can use on the tying bench or at the river as long as you are using ambient light. Easy techniques to get you one step up on your up close shots.
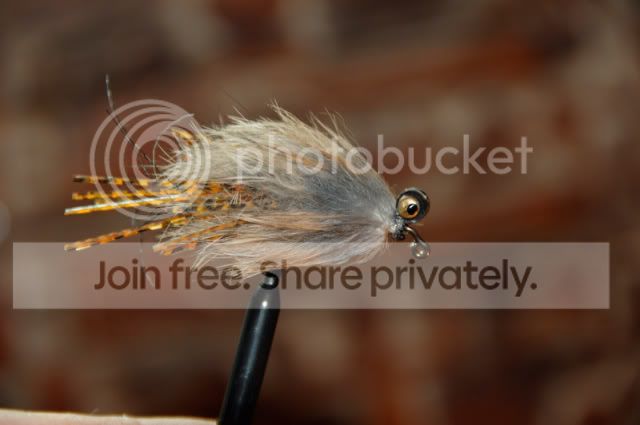
However, you will soon get in to trouble when you pop up the flash. Now you are dealing with shadows, halos, bounce back, bleed-in, and all the problems associated with flash (that is assuming the use of on camera flash and only a basic understanding of light theory).
This is a typical beginner shot and can be very frustrating if you don’t why things went wrong. It is common to think that a black background should look black and a green background green. However, that is not necessarily true. In this shot I used a pure black background but (and this is key) it was placed only inches from the fly subject and I used flash. When the flash pops it sends a direct beam straight to the background on it’s way to lighting the subject. Thus the background acts as a reflector and shoots the light back at the camera sensor and the final exposure is a grey background with harsh shadows.
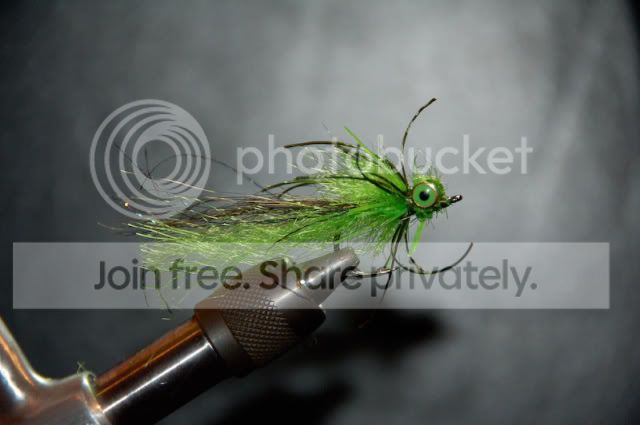
Even if you change the background to green or any brighter color you still have problems with bounce back. Here I used a green background but still placed it only inches from the subject. Notice what happened, the white rubber actually has a halo at the edges and the fly itself has a green hue because the background reflected back at short distance.
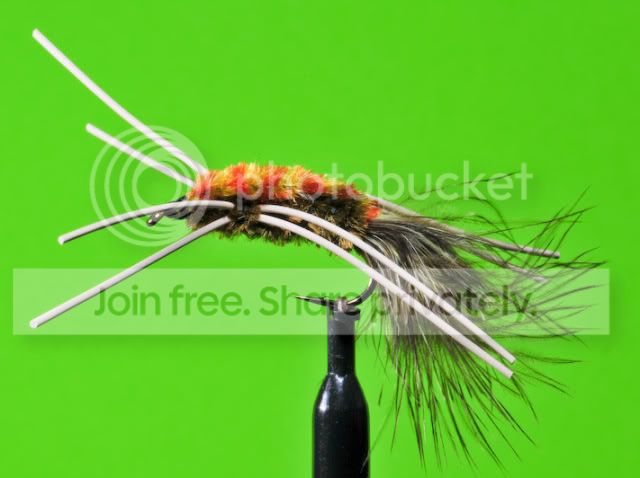
Look at the fly in this picture and notice the black background close behind.
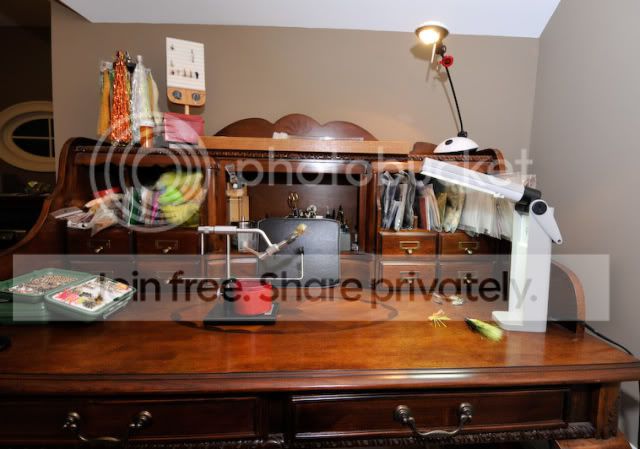
Now we step to the next level. Take the flash off the camera (if you have that capability) and direct it parallel to the fly vise. The flash will shoot parallel to the background while illuminating the subject and thus avoid direct lighting the background. Better looking picture and the background appears to be black. However, there is still some bleeding of light on the right side and you get the feel of a black-grey gradient because you still had the background only inches from the subject.
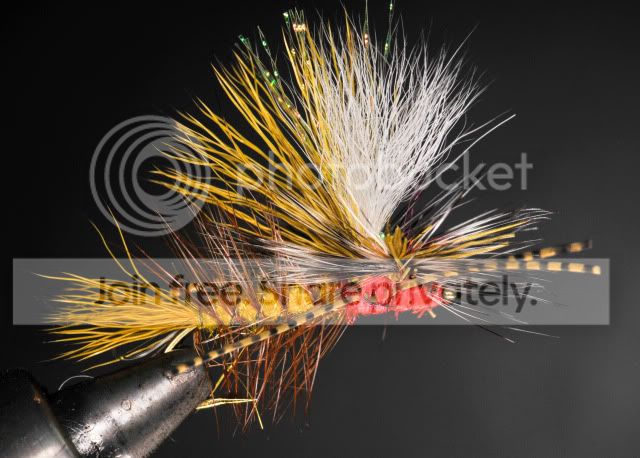
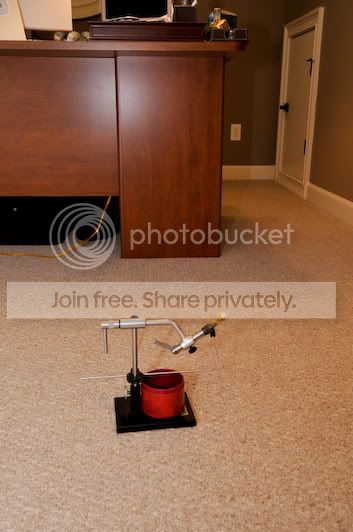
And now to Morsie’s point about moving the background away from the subject. Here I sat the vise on the floor about 3 feet from my “brown” desk. I then took two flashes and aimed them parallel to the vise at the head and tail end of the fly. F/22 at 1/320. There it is – the background is gone and appears uniformly black. No brown in sight. Note: even if the desk was hot pink this picture would still appear to have a black background. Unfortunately, there are many things technically wrong with this picture but you get the point about the background.

Depth of field.
For flies or bugs you need small apertures (large f stops, or is f number I can never remember) like f18-f32 in order to get everything in focus. Remember, small hole means less light so flash is often necessary.
Shot of a fly at f4.5 using the P (auto) mode.
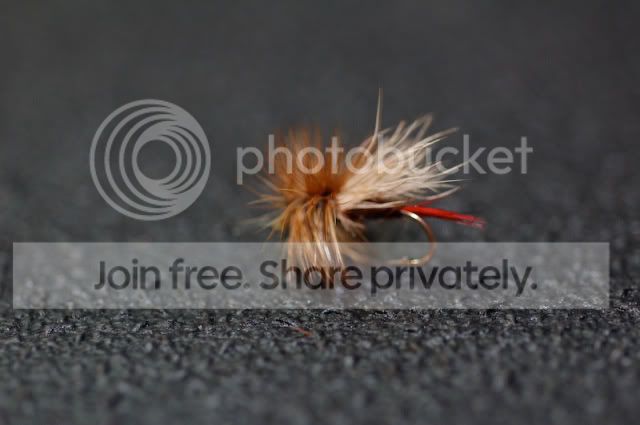
Terrible. Only a small sliver is in focus and worse yet the entire fly is blurry because it is not in the field. With small working distances required with macro your depth of field is literally only inches as shown here. You need to “stop down” the aperture in order to open up your depth of field.
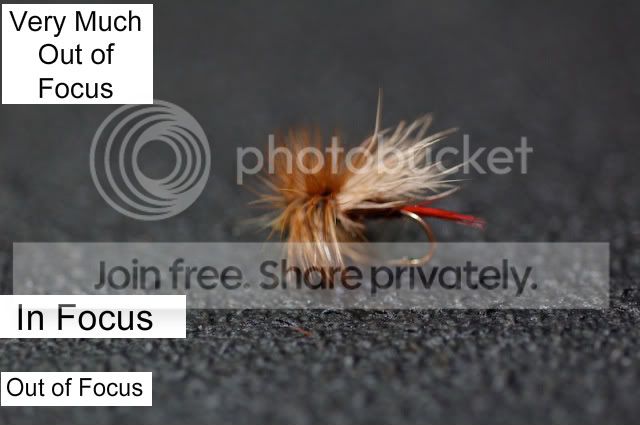
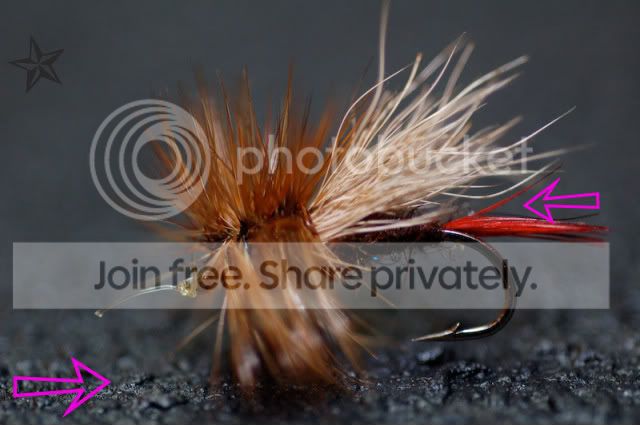
Here’s the point – you can’t simply use the P or auto modes on your camera to take pictures of flies or bugs. It won’t work!!! The camera will meter and choose f stops like f4-8 and your shots will not be in full focus because of the shallow depth of field. Furthermore, you can’t always rely on A (aperture) mode either because if you choose f22 then your camera will stab you in back and choose a long shutter speed (sometimes long enough to go make a cup of tea before it finishes the exposure). You can get around this by using a tripod but the shutter speed will still be very long.
I will stop at this point because honestly that is about where I am in my own learning curve. I am now shooting only in manual mode in combination with flash and creative lighting; struggling through every minute but trying to make it look easy, hahaha. I am constantly inspired by the professional images posted here. There is some serious talent on this site to keep you going.
Nov 17, 2008 at 4:59 am #65531MemberCool, thats what I was struggling with, and exactly what I needed to know.
Thanks a million Neal.
I will go and practice now!Nov 17, 2008 at 5:21 am #65532Mike McKeownMemberMe too, thanks boss…
Neal – ever thought of putting a little fishing photography book together, you can send it to me to see if works… I can be your test case…
Nov 17, 2008 at 5:46 am #65533MemberThanks for taking the time to say what I was trying to say Neal. Great stuff!!! 🙂
Morsie
Nov 20, 2008 at 7:36 am #65534MemberBeen taking a few more – think I’m getting somewhere:


The legs on the fly have faded a little, not totally blurred 🙂
Not to great, but I’m least seeing what Neal and Morsie were talking about re the background. Neal, you are right, this is addictive.
-
AuthorPosts
- You must be logged in to reply to this topic.