


One of my favorite flies, the HL Midge
- This topic has 13 replies, 7 voices, and was last updated Jun 3, 2009 at 7:32 am by
 Mike McKeown.
-
AuthorPosts
-
May 20, 2009 at 12:39 am #6549
Abe Mathews
MemberOK, I’m going to try this. I’m an awful photographer, and not much of a tier, but you all will just have to suffer through it. This is an excuse to play with the macro mode on my new camera, a Pentax Optio W60. I know the lighting is bad, I have every light I can grab on the subject right now.
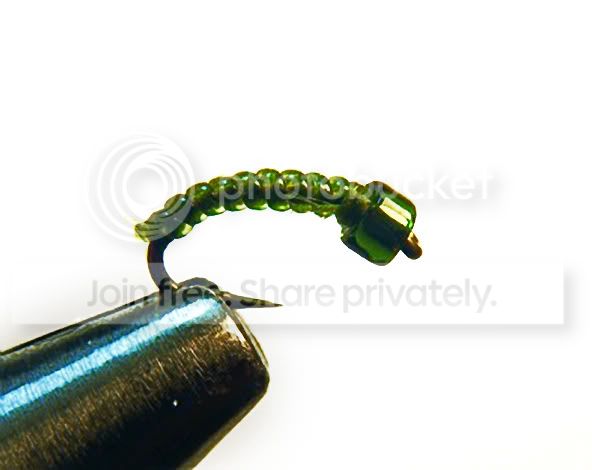
I call this the HL Midge. I am positive that at least 5,000 other tiers have come up with this, but I can’t find a real name for it. The HL stands for Hobby Lobby, which is where I bought the material that makes up the fly. This is my go-to fly on the Clinch River tailwater now. I have fished Zebra midges up there for the last 4 years, but I figure every trout in the water has seen Zebras by now. Last fall I started playing around with different materials and watching the bugs on the water. It always appeared to me that the midges developed a translucent halo around them from the gases under their skin. I wondered if I could get that effect with other materials. I also noticed that the midge heads looked somewhat squared off, moreso than the rounded beads I’ve been using.
So one night Hobby Lobby was having a sale on beading materials, and this is what I came up with. It’s stupidly easy to tie, durable as hell, and catches fish. This fly has accounted for two of the largest trout I’ve caught on the Clinch. They’re not huge by other’s standards, but they still have made my day.
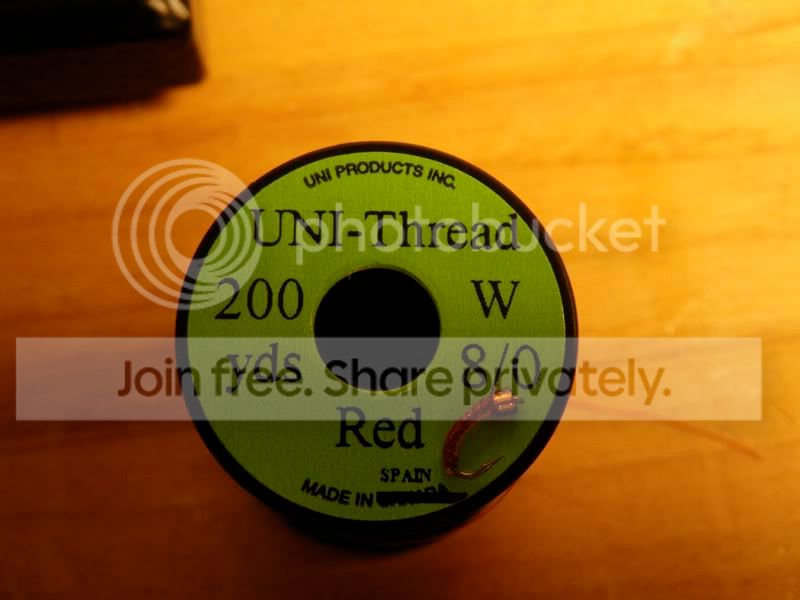
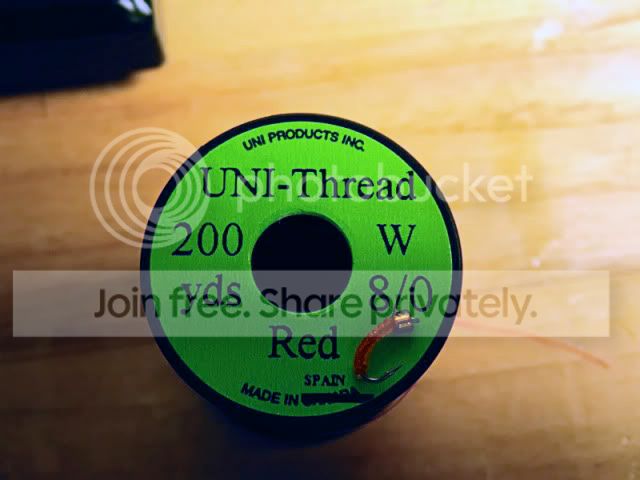
OK, so we start out with the materials list. 8/0 Uni Thread, Red:
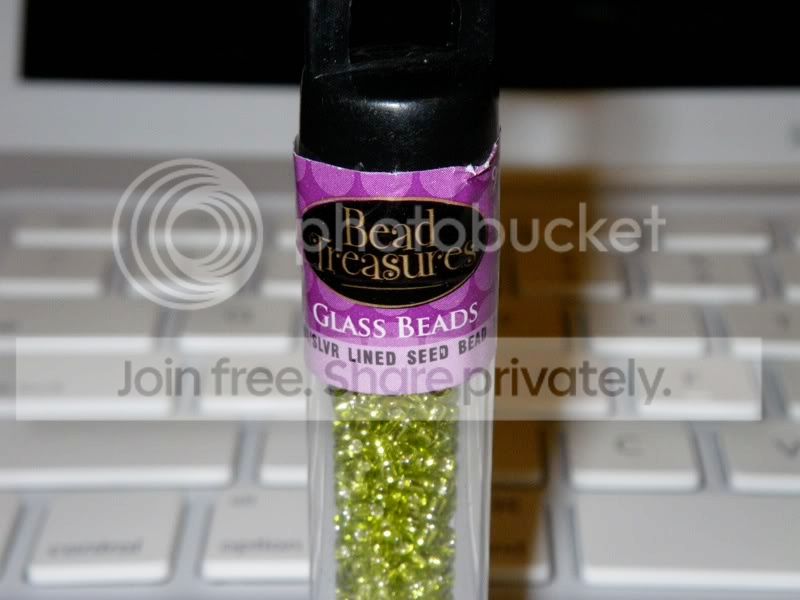
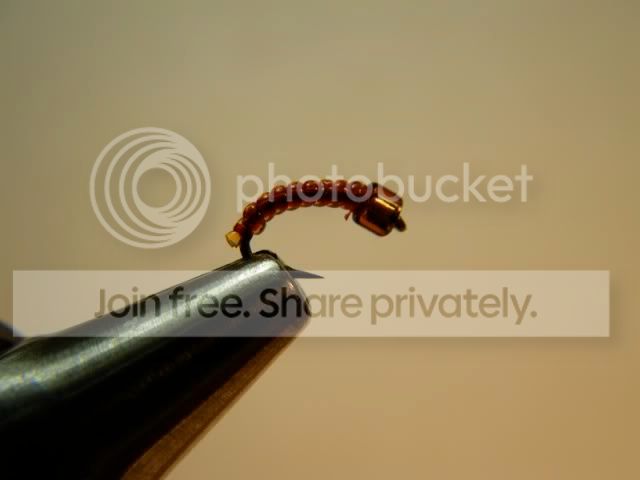
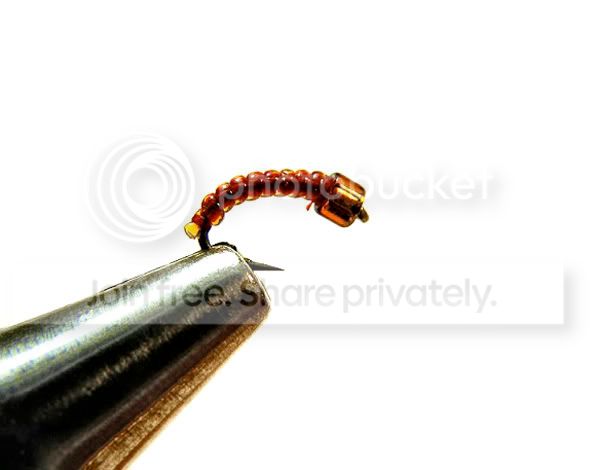
Yes, that’s they finished fly on the thread spool. Then the bead. These come from Hobby Lobby, and they’re size 10/0 silver lined beads. The pictured beads are lime colored, but the one I am using on this fly is a root beer color:
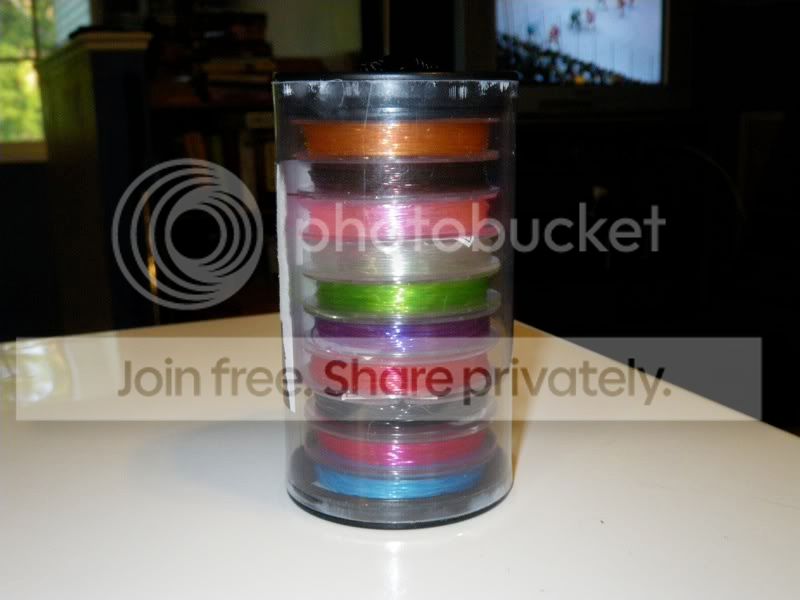
The body material is a jelly-rope type material for beading. I got this sweet stack of colors, each one with something like 10m of materials for $6:
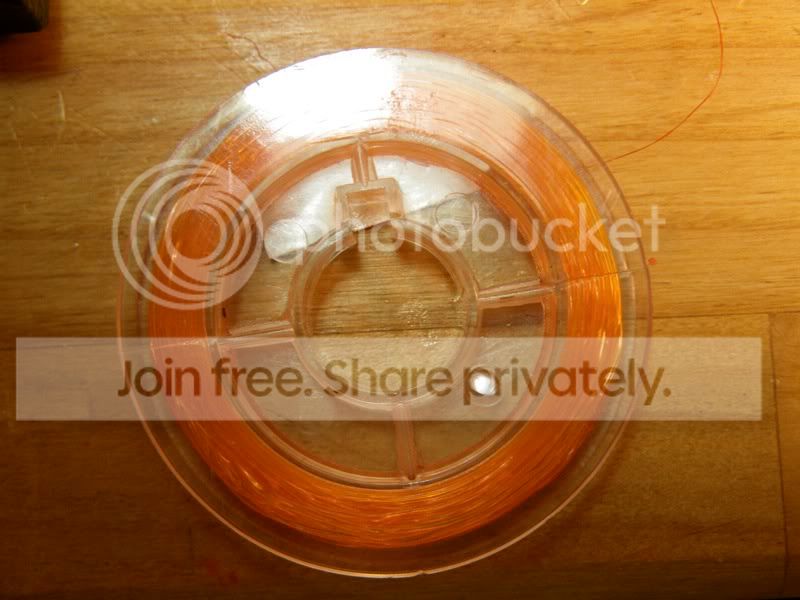
Here’s the spool we’re using, a fire orange:
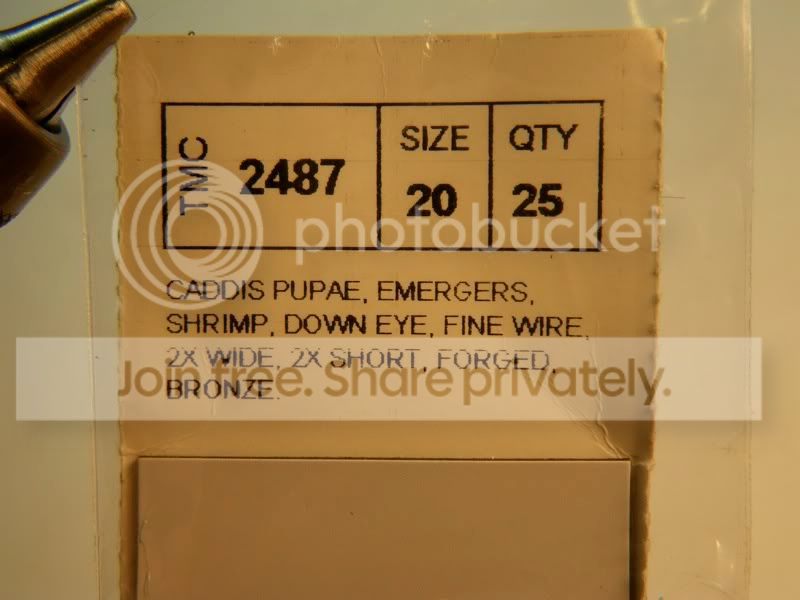
Hook is a TMC 2487. I also use the 2457 and I just started using the 2488H, which I like a whole lot:
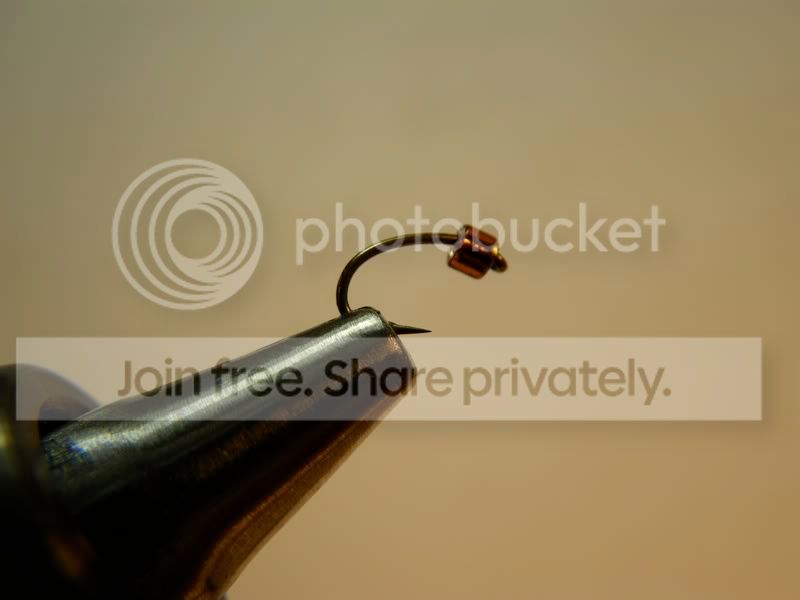
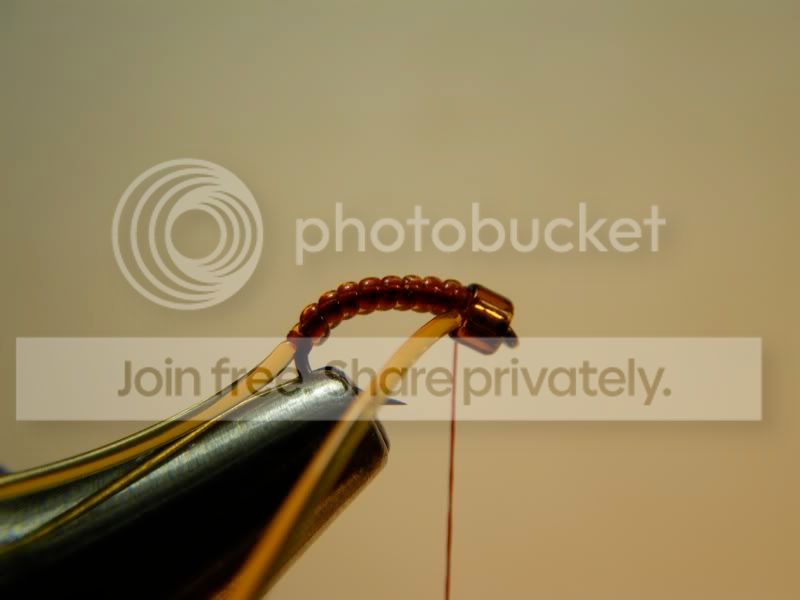
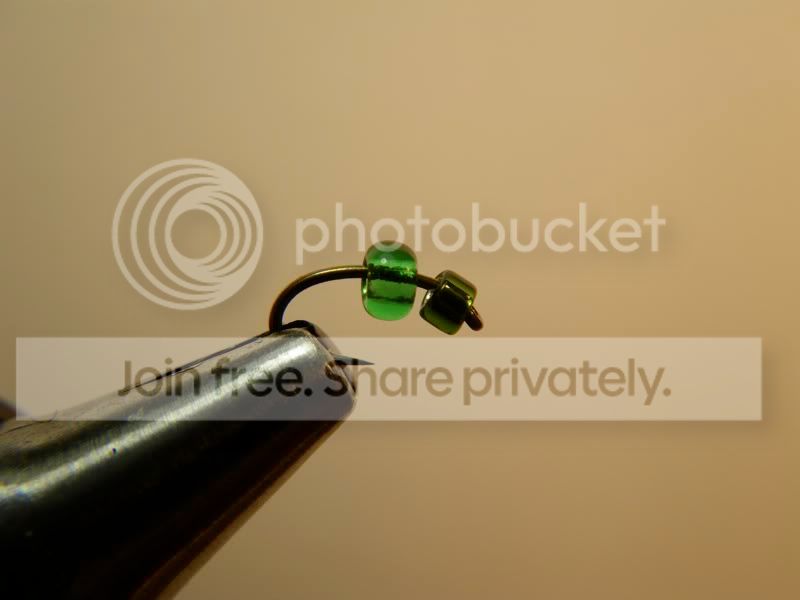
So here’s the hook and bead in the vise:
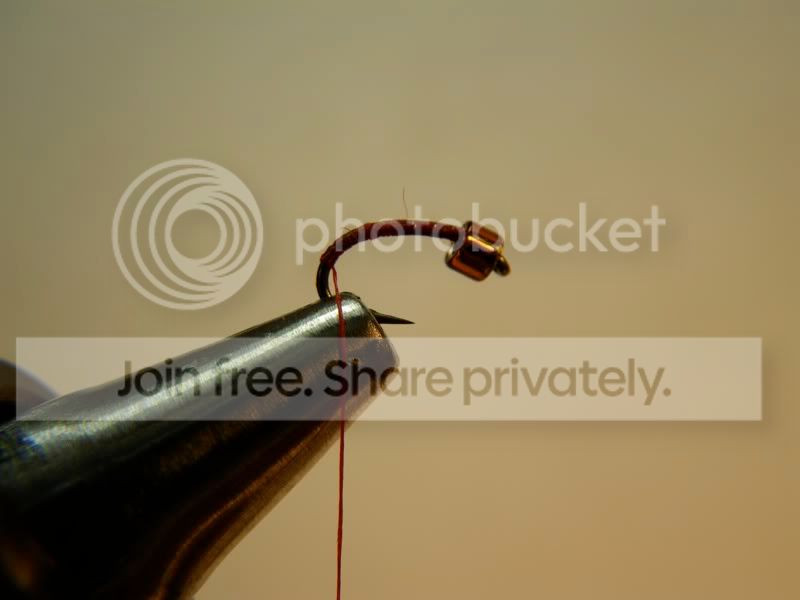
Start the tying thread and wrap an even base back to the tip of the bend. Leaving gaps in the thread also works, as it adds a variegated base color to the fly:
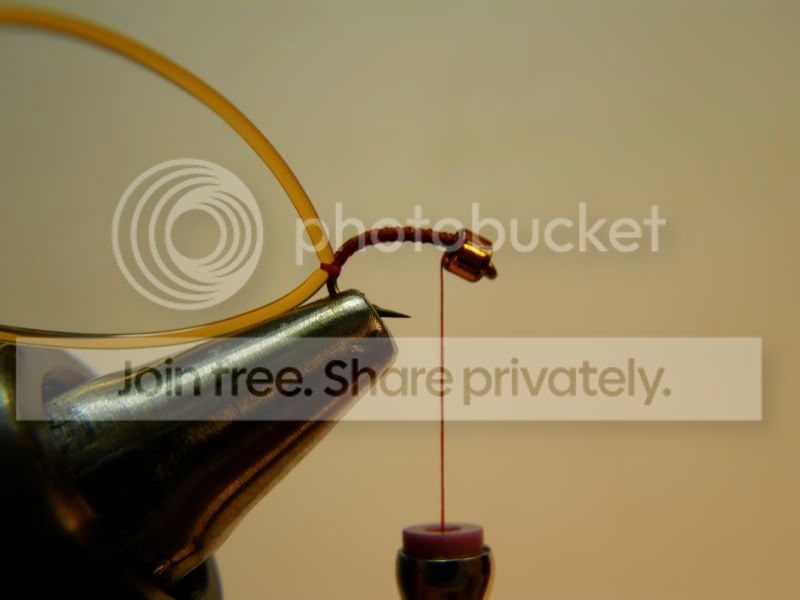
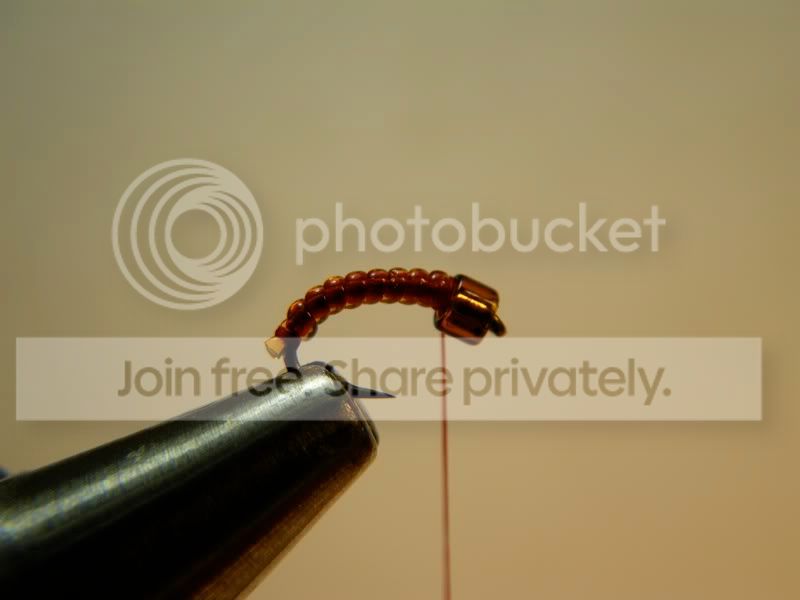
Here’s where I differ from a lot of recipes I’ve seen. I think the midge body should be narrow. Some recipes I’ve seen call for wrapping this type of material along the hook shank. I tie the material in at the end as if I were leaving a tail of beading cord behind the fly. I use 4 wraps with increasing tension to hold the cord in place. Then wrap quickly back to the bead:
I counter-wrap the beading cord up to the bead. I think this helps when tying off with keeping the fly from unraveling. I hold the tag end of the material in my left hand when starting out. I use a lot of tension on the first few wraps and back the tension off as I get closer to the bead to try to taper the body some. I use 4 wraps to secure the beading cord.
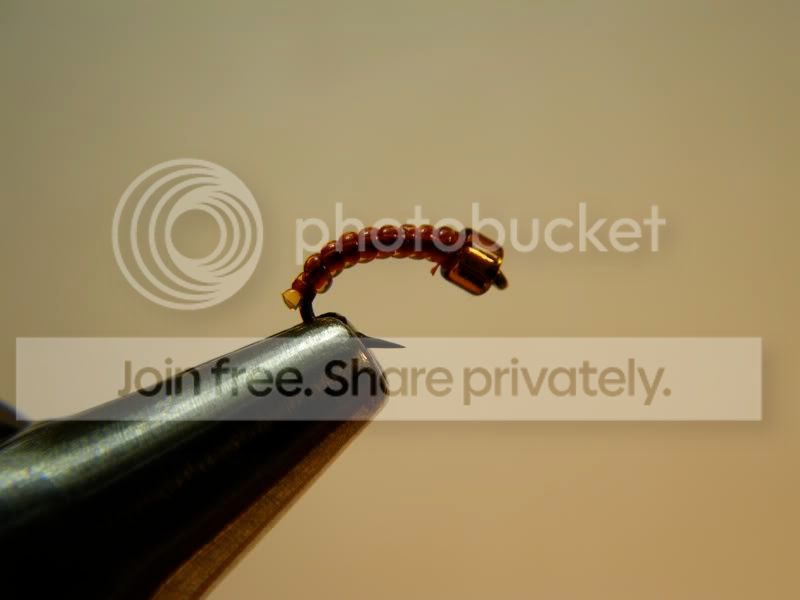
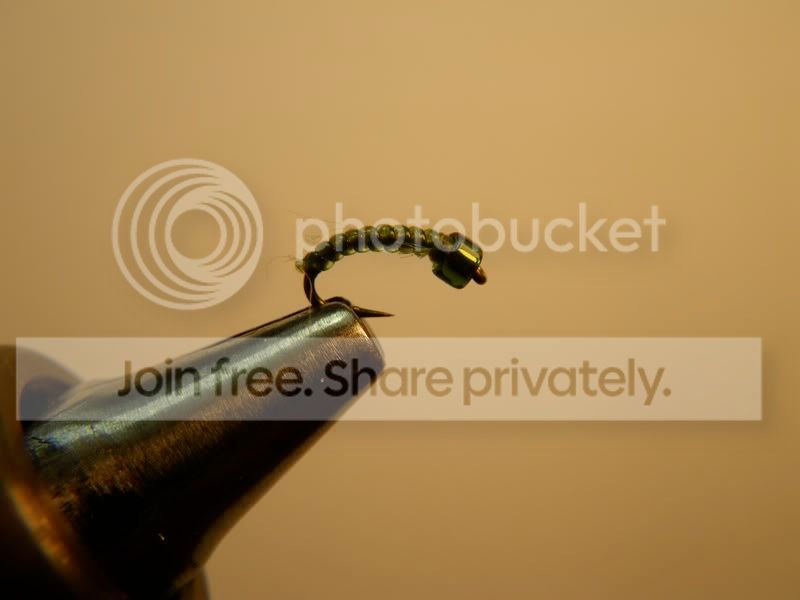
Pull the cord tight before cutting, it will retract back to the wraps. I muffed this a bit and ended up with a small tail of beading cord at the back of the fly. I haven’t noticed that as a problem:
An 8-wrap whip finish and you’re done!
I fish this as the point fly in a 2-fly rig. I normally have a heavily weighted size 16 Sparkle Pheasant Tail (If this goes well, I’ll do a tutorial on that one) under an indicator. 2′ of 5X to the PT, then 18″ – 24″ of fluoro 6X to the HL Midge. I carry the HL Midge in size 20 and 22, in the shown red/orange and olive/chartreuse. The fish seem to prefer the red/orange combo, but it’s somewhat dependent on the day. To get deeper, I will sometimes put a size 6 split shot about 8″ above the fly.
I fish this across into holes by casting about 4′ above the hole and letting it drop from the shelf. Takes are normally pretty solid. The only downer is that the bead is somewhat fragile, and will break if it bounces off the rocks.
Hope this fly works for you all, and I apologize if this is one you all know already. Also I apologize for the photo quality, this is new to me. 🙂
Abe
May 20, 2009 at 1:05 am #57449bill heffner
MemberGreat job on both the fly and the tutorial.
May 20, 2009 at 1:22 am #57450dusty montgomery
MemberAwesome fly, no doubt! I tie some that are similar to this myself, but my question is this:
Where in the hell did you find this, and how do I get one?
Dusty
May 20, 2009 at 1:26 am #57451MemberNevermind, I went back and read the whole post this time. Amazing how much more effective it is to read it in its entirety. Does that collection come with olive, or is it available otherwise?
D.
May 20, 2009 at 1:27 am #57452MemberThat stack is sold at the Hobby Lobby chain of craft stores, in the beading section.
May 20, 2009 at 1:28 am #57453MemberThat’s the only stack I’ve seen there, and the Chartreuse is the closest thing you get to Olive. However with olive thread it really looks slick.
May 20, 2009 at 1:39 am #57454MemberThanks Abe! I will go look at my local Hobby Lobby.
Dusty
May 20, 2009 at 11:14 am #57455keith b
Membernice stuff Abe, thanks.
May 24, 2009 at 1:37 am #57456MemberHey guys, I sat down to tie the olive version with the beads I bought at Hobby Lobby. I quickly found a problem. They’re the wrong beads. I’ve bought beads from a number of places, I just could not remember where the ones I’m using came from. Tonight I went into Michael’s craft store, and found ’em. Here’s the package:
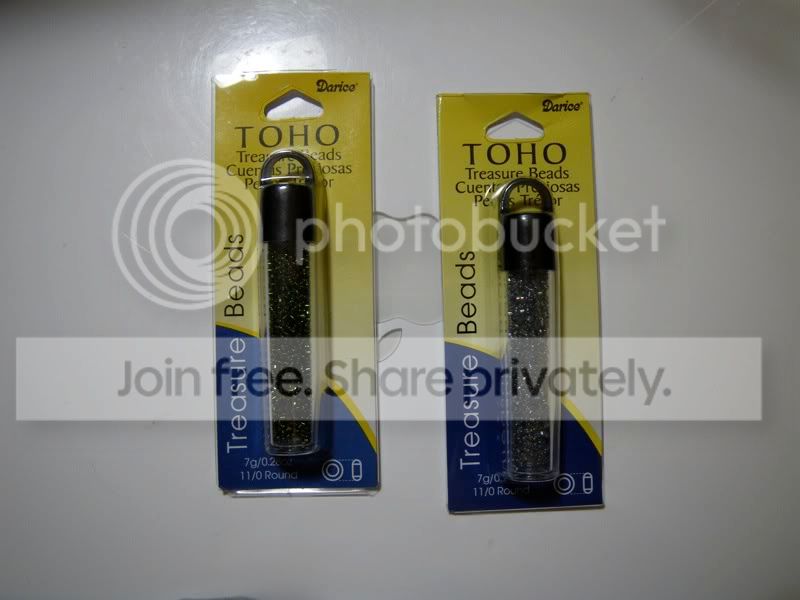
Here’s the comparison between the Hobby Lobby and Michael’s, Hobby Lobby on the left:
The Hobby Lobby bead might be OK on a size 16, but it’s way too big to be proportional on a size 20.
So here’s the fly with an olive Toho bead, olive 8/0 Uni-Thread, and the chartreuse beading cord as a body material. Sorry about the thread fraying on this one, my index finger is rough as heck and mucked the thread up while tying it.
I think the chartreuse adds a highlight to the olive, but certainly doesn’t overpower the body color.
May 24, 2009 at 4:14 am #57457Neal Osborn
MemberAbe,
Wow, I completely missed this post until now. Great tutorial. Thanks for posting. That is a very detailed set of instructions and a cool looking fly.
Your pictures are great and I really like how you draw the viewer to the overall process of tying the fly. Your white balance is a bit off but we can work on that; otherwise solid photo-documentation.
Here is a quick example of color correction on your final image.
May 25, 2009 at 3:09 am #57458MemberAbe,
I will respond to your message here so others can read and learn.
White balance is important for any photograph but especially critical for fly tying photography. The viewer depends on the color of the material to understand the pattern. There are two options for balancing color in .jpeg – either “in camera” or during the shot or “post” using computer software. Photographs captured in RAW format are much easier to correct in post because the digital negative “raw” information is available to manipulate. However, most camera like the Pentax Optio and Olympus Stylus and other point-and-shoots do not have RAW available. Instead they use .jpeg which is a smaller compressed file, which unfortunately can’t be manipulated as efficiently. Thus, getting the white balance correct from the beginning will save you time and frustration when shooting .jpeg.
***Getting correct white balance in-camera***
For the Pentax Optio W60 (for example), download the .pdf user’s manual here http://www.pentaximaging.com/files/manual/OptioW60_e_web2.pdf
Page 51 – How to work the menus to set white balance

Page 108 – This begins the discussion on how to set your white balance. Learn it!
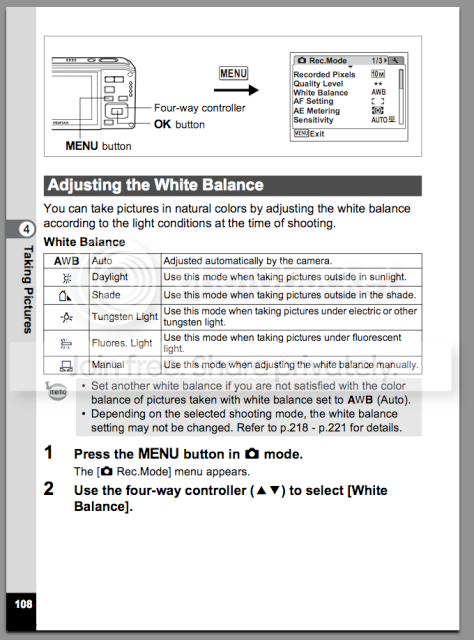
Page 109 (THE MONEY PAGE) – The Pentax Optio is awesome! It allows you to set a custom white balance! Again, “A custom white balance”! I wish my Olympus Stylus had this feature, it’s a big deal. Basically, you will set up your background at the beginning of each series of shots and record and set the white balance from the background (use a white or neutral grey background and avoid colors).
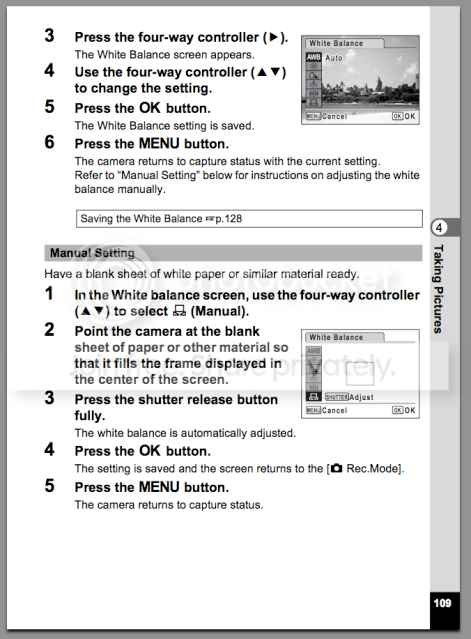
Page 110 – This tells you how to “meter” your fly subject. All cameras have three basic metering functions which include “multi – or – matrix”, center weighted, and spot metering. For fly pictures I generally choose spot metering because it will focus/meter on the fly itself instead of that big white background behind your tiny little fly.
***How to correct white balance on the computer without expensive software***
Here I used iPhoto but all entry level software programs offer similar sliders/adjustments (iPhoto is very good actually).
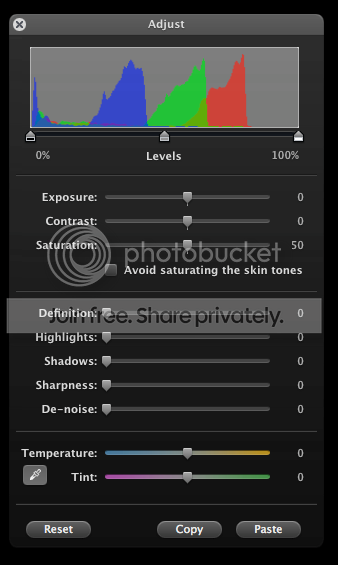
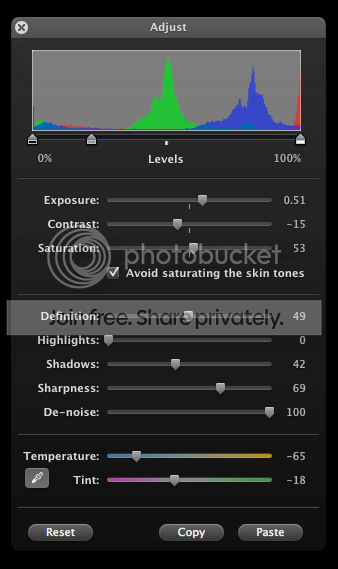
This is a screen capture of the original photograph. Notice the yellow/orange color cast on the background. This comes from the use of incandescent lighting, whether or not fluorescent lighting is used in conjunction with the main light source. To remove a color cast you have to add more of the “opposite” color. So here we will put the picture in edit mode and go the temperature sliders (if you had a RAW file and Photoshop or Aperture/Lightroom you would have more editing capability and adjustments). Adjust the sliders first with temperature to the blue/purple spectrum to cool the image. Then adjust the tint to either green or purple until the whites look white. It won’t be perfect, but it will certainly be better than the original. Once the white balance is set you can hit the image with the additional sliders above until the fly pops and looks better. Notice the settings I made below.
Hint – Once you’ve done all this work make sure to click the Copy button at the bottom so that you can apply these settings to additional images from the series by opening them into edit mode and clicking Paste. This is a huge time saver. 🙂
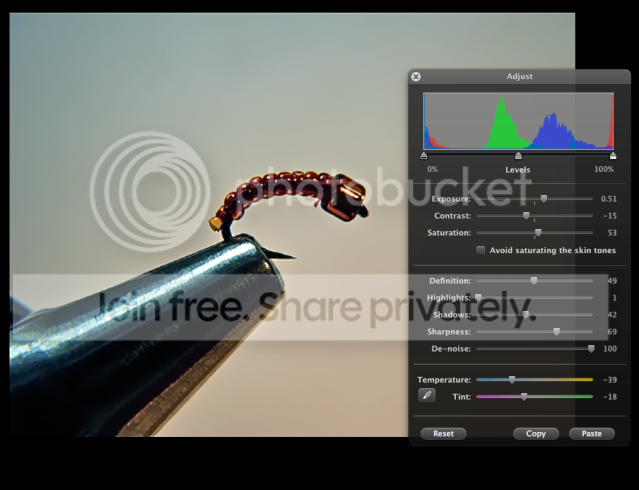
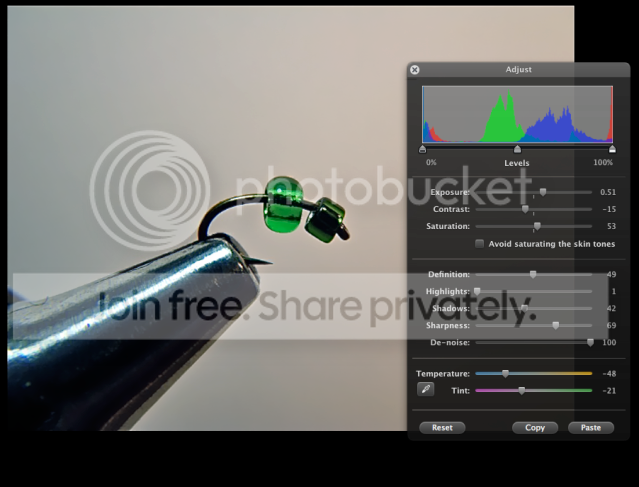
Original Image
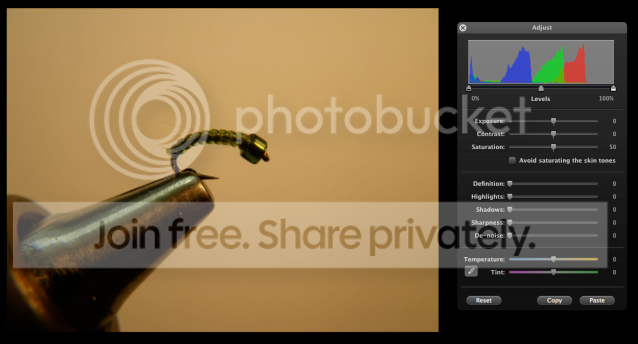
Original Adjustment Sliders set to zero
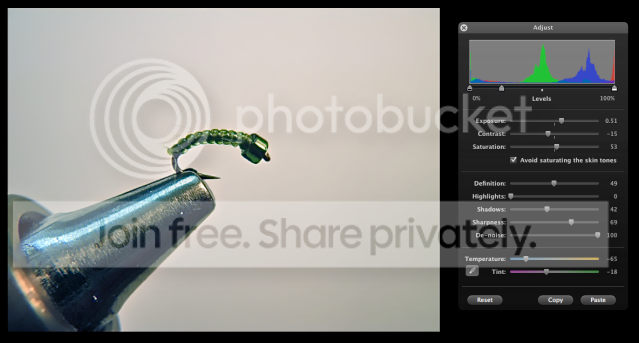
Modified Image with corrected white balance (not perfect, but much better). Remember, the better the white balance correction in-camera, the less work and better results in post.
Modified Adjustment Sliders (make sure to click Copy to save the settings).
Once you have copied a white balance adjustment, it can be applied to additional images with a simple paste function. Here are two examples. Notice that I made a few additional adjustments to each photograph to tweak the color.
***Advanced color correction with Photoshop***
Original

Color/WB corrected
Original

Color/WB corrected
Original
Color/WB corrected
 May 25, 2009 at 10:18 am #57459Member
Neal, that is freaking awesome.
Jun 2, 2009 at 4:33 am #57460david knapp
MemberMan, this is what I love about this site.
Jun 3, 2009 at 7:32 am #57461 Mike McKeownMember
Hey Doc, thanks boet…
-
AuthorPosts
- You must be logged in to reply to this topic.