






I'd forgotten how difficult this is
Blog › Forums › Photography › I'd forgotten how difficult this is
- This topic has 27 replies, 5 voices, and was last updated Jun 10, 2013 at 9:14 pm by
 Brett Colvin.
-
AuthorPosts
-
Jun 8, 2013 at 5:35 am #73970
 Brett ColvinMember
Ben – it has been fun getting to know you a little better through this exchange. Again, my sincere thanks for your comments and encouragement. The article on dark field imaging was a nice read and very informative as well, I’m glad you passed that along.
I also love the Ezyboxes, as well as the Ezybox II – great line of products.
Incidentally, back in the day I shot an extremely simple DIY setup for relatively small objects that was almost identical to this Strobist post:
http://strobist.blogspot.com/2006/07/how-to-diy-10-macro-photo-studio.html
My sweep was also posterboard, which I mounted using Velcro so that I could switch out backgrounds quickly and easily. Having one light shooting through the side and one from the top was a very workable and dirt cheap solution.
The diffusion material I liked the best for the sides of the box was vellum paper, fairly heavy such as 30-pound.
It’s a remarkably flexible approach, even using the box flaps essentially as aperture flags. You could certainly fire the on-camera flash up the middle for fill too.
Sounds like Zach is in good hands if you are on the case. Have a great weekend.
-
This reply was modified 13 years, 4 months ago by Brett Colvin.
Jun 8, 2013 at 9:29 pm #73986 J A Y M O R RMember
I know how you roll Colvin! A setup that can be held, which produces both in the studio and in the field.
Inquiring minds want to know….
shot of Brett Colvin getting it done.
 Jun 8, 2013 at 10:02 pm #73987
 Ben CochranMember
Hey, thanks Brett and I have really enjoyed this exchange. We used to have a lot of threads, on this board, there were along the same exchange. So glad that Zack started this thread, great community input and we all pick up something from them. 🙂
This has been fun, as I decided to really limit myself to what I could use and keep it at what I think Zack may already have available. Kind of like a location shoot and I know that David Anderson has also been in this spot before, “on assignment with a strict deadline and have to make the shot work with what we have available”, no running off to the store.:) I don’t know if this will work for you, Zack, but I decided to really push myself and try to pull this shot off with just one speedlight. If you like it and it works for you, I will diagram it out ad post it for you. If not, I will digram out the two speedlight setup with DIY scrims.
this first shot is straight out of the camera, all I did was crop out the DIY bounce cards. the second is the same shot with a few minutes of postproduction. I should have polished the reel first but as the single light solution came to me, I kind of got excited and rushed into it. Polished first, the inside of the reel would have looked 100 times better. Nonetheless, below is the unprocessed and then processed files. Wanted you to see how much postproduction would actually be involved with this arrangement.
Jun 8, 2013 at 10:15 pm #73991Zach Matthews
The Itinerant AnglerBrett those are sick. You should send that top one to Kristen Mustad at Nautilus if you haven’t already – he was looking for product shot assistance a few years ago (which was actually when I first did this).
So just so I’m clear, all you have is a softbox on a strobe on the left and on the right, with a posterboard below and behind the subject? How do you eliminate the horizontal line where the edge of the table falls off?
Are you knocking the strobes up to like +3.0 and then underexposing through camera or what? I’d love to see the EXIF date on that Vanquish shot. The problem I always had with this was blowing highlights when I get the rears to blow. In fact, I’d love to just see a PICTURE of the studio.
Great discussion guys; thanks.
Zach
Jun 8, 2013 at 11:06 pm #73992Ben CochranMemberI agree about Brett’s shots!
I am reposting the two examples, as they had a major set flaw that I wanted to fix. In the process o adjusting the set, I knocked everything over and had to reset it all… ARRGGGGG lol I also made a couple of adjustments and added a little kicker to minimize the amount of shadow cast.
This is the flaw, as seen in the previous post.
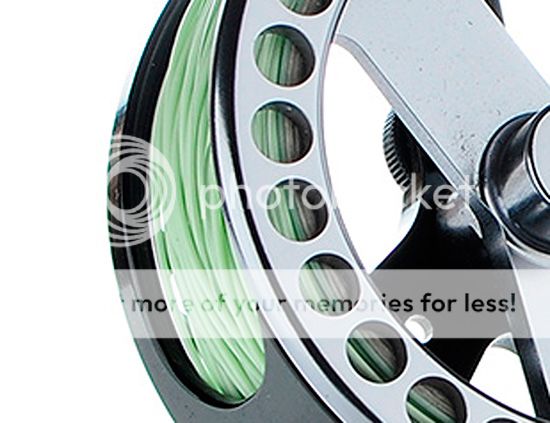
These are the newer shots: First unprocessed and second processed and cleaned up a tad. Again, these are shot with just one speedlight, with no additional lights, including no ambient light sources.
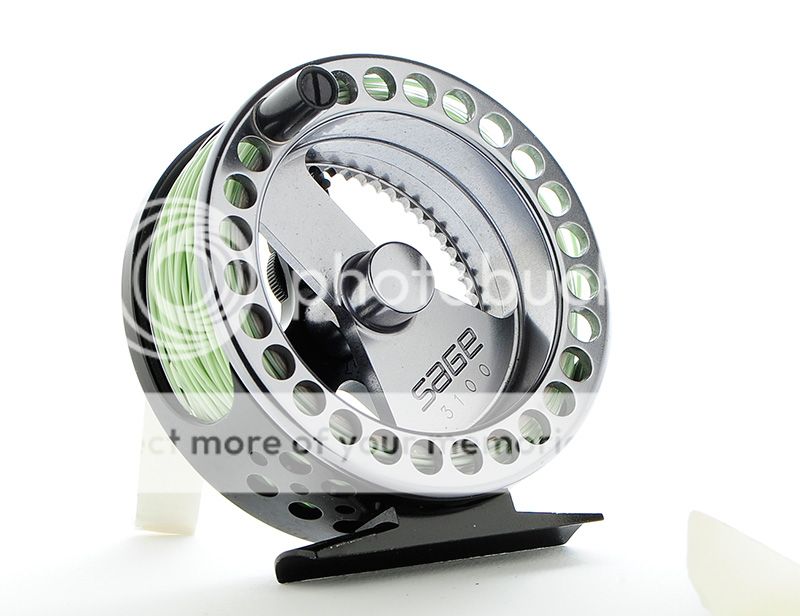
Processed
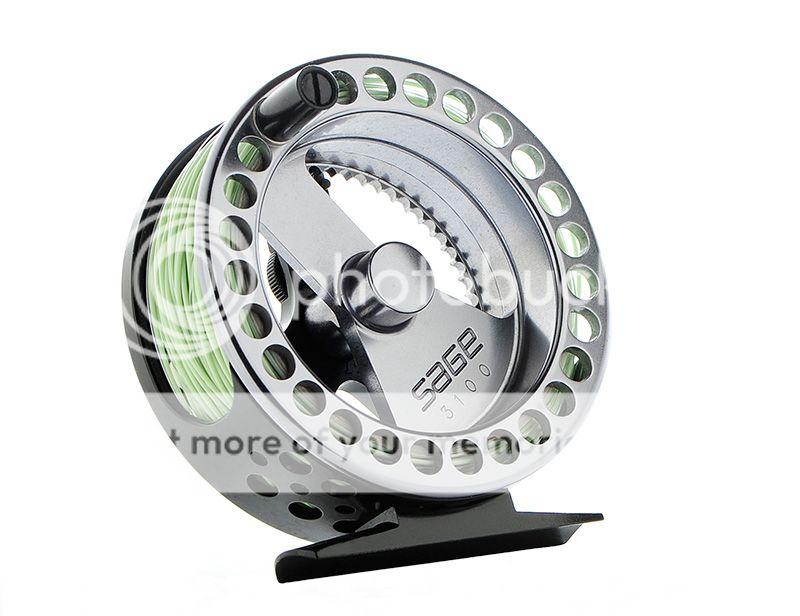
Oh yea, about $5.00 in total for set materials.
-
This reply was modified 13 years, 4 months ago by
 Ben Cochran.
-
This reply was modified 13 years, 4 months ago by Ben Cochran.
-
This reply was modified 13 years, 4 months ago by Ben Cochran.
Jun 8, 2013 at 11:16 pm #73995Brett ColvinMemberBen – Nice work man, that’s a well-lit shot with a single speedlight.
Zach – Thanks for the props, I appreciate it. You are correct, I’m using one strobe in a soft box on either side of the camera and slightly above. The table is up against a wall so that the poster board creates a 90° curved sweep. This eliminates any line, you just have a continuous surface starting flat on the table and then ending up vertical against the wall. Here I’m shooting a 100mm macro, and even the slightest elevation of the lens above the front of the table will clear the field of view.
My exposure depends on what I’m trying to do. Like Ben mentioned I sometimes intentionally leave shadow detail to anchor my product shots. Generally, I have to dial back my strobes from full power if I am shooting at f/8 to f/11, and then I’ll shoot at full power from about f/22 on down. At larger apertures it doesn’t take a lot of flash to blow out the white poster board.
You can get a lot of effects this way. Laying some diamond plate down over the poster board but leaving the vertical sweep intact, I can simulate 3 light sources for something like this:
 Jun 9, 2013 at 4:00 am #73997Ben CochranMember
Thanks Brett and like your last shot, as well. I am and was determined to figure this beast out, with just the one light and answer Zacks call for the Holy Grail(no need for postproduction work), at the same time. I got it!!!!! 🙂 Finally figured out hot to get the desired high key shots without having to do any postproduction. This is straight out of the camera, not even a crop.
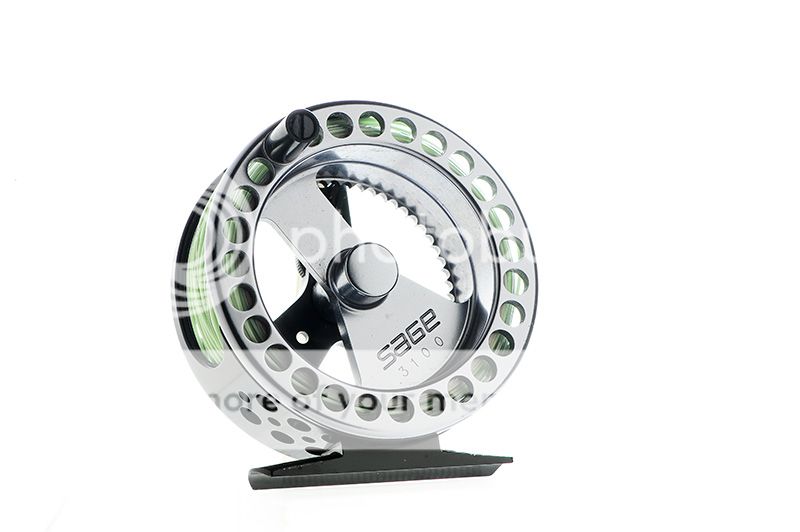
This is the basic layout: One speedlight with no ambient light (shoot in total darkness), white bounce cards and some negative fill with a few flags scattered about. If you notice the shadow a bit of distance underneath the reel, that will give you an idea of how well my chosen base worked. I had one of those “duh” moments, when I thought of it— it is the diffuser dome for another speedlight. Diffused the light inside of the dome and it made it disappear against the background— as I said: A “duh” moment. 🙂 Another “duh” moment came when I was trying to figure out what to use to prop the reel at the angle and still meet Zacks “Holy Grail”(no postproduction work) criteria: A clear plastic straw lightly sanded to diffuse the light inside the chamber…
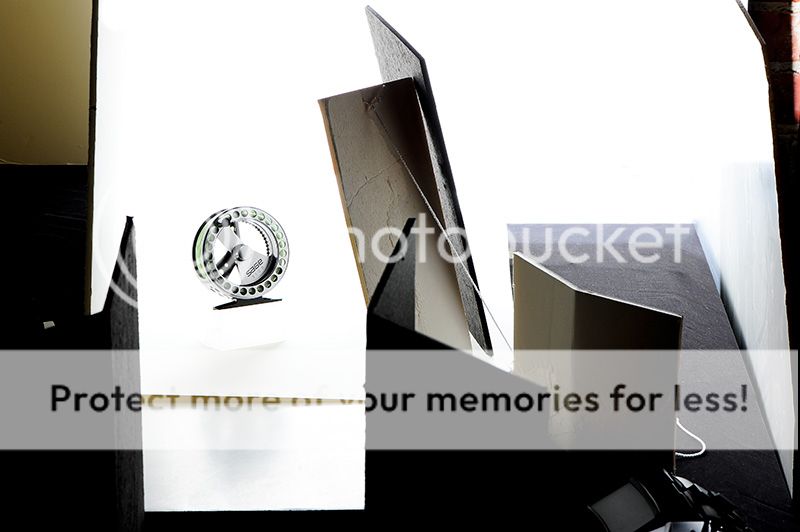
Again, around $5.00 in total materials for the set. Hope this helps some that may want to use the layout. 🙂
Brett, really did enjoy the back and forth and very glad that you posted your examples! Look forward to more. 🙂 Lots of fun in having to put a lot of thought into a creating a limited resource solution for this too so, thanks for thread, Zack.
-
This reply was modified 13 years, 4 months ago by Ben Cochran.
-
This reply was modified 13 years, 4 months ago by Ben Cochran.
Jun 10, 2013 at 9:14 pm #74006Brett ColvinMemberZach: If you are interested there is a great read out there called Minimalist Lighting: Professional Techniques for Studio Photography by Kirk Tuck.
There are some very useful diagrams of setups and techniques that helped me out quite a bit in the early going.
Minimalist Lighting for Studio Photography
In this series there is a second title called Minimalist Lighting: Professional Techniques for Location Photography that is also outstanding. The author was a full-time pro who traveled around with a Suburban-load of studio strobes and a full-time assistant. Basically this describes how he transitioned to doing most of his location work with 3 speedlights and a complete kit that fits into a single airline roller bag.
Minimalist Lighting for Location Photography
I found both of these worthwhile and each book contains concepts that are applicable to studio or field work.
-
This reply was modified 13 years, 4 months ago by Brett Colvin.
-
This reply was modified 13 years, 4 months ago by
-
AuthorPosts


- You must be logged in to reply to this topic.