


Fly Photography Repository (Montage Post)
Blog › Forums › Photography › Fly Photography Repository (Montage Post)
- This topic has 32 replies, 10 voices, and was last updated Feb 8, 2009 at 4:17 pm by
olle bulder.
-
AuthorPosts
-
Jan 13, 2009 at 2:10 am #7923
Neal Osborn
MemberBelow is a montage of previously posted topics on photographing flies or fly tying. This topic comes up often and my goal was to organize some of the previous posts into one location or repository and build up the topic for future use.
Feel free to copy and paste previous comments you have made on the topic or post new comments here.
Jan 13, 2009 at 2:11 am #66569MemberWhy not . . . let’s keep going.
Jan 13, 2009 at 2:11 am #66570MemberHere are a few internet links on macro photography I’ve collected
http://digital-photography-school.com/blog/macro-photography-tips-for-compact-digital-camera-users/
http://www.photomacrography.net/
http://homepages.tig.com.au/~parsog/photo/macro.html
http://www.cameralineup.com/blog_8.shtml
http://www.shutterbug.com/refreshercourse/lens_tips/172/
http://www.geocities.com/SoHo/Workshop/4881/photolesson1.html
http://www.photoxels.com/tutorial_focal_length.html
http://www.naturemacrophotography.com/indexNGM.html
http://www.alrfoto.com/galleries.htm
http://www.smashingmagazine.com/2008/09/21/25-beautiful-macro-photography-shots-photos/
Jan 13, 2009 at 2:12 am #66571MemberSome additional internet links on macro photography.
Jan 13, 2009 at 2:12 am #66572MemberA while back I made a similar list for photography because I found myself needing a quick assessment checklist for my pictures. When starting out you don’t always know what questions to ask yourself in order to make adjustments. Furthermore, we often see wonderful pictures posted on the internet and want to create similar images ourselves but don’t know how to go about breaking down a shot into parts for examination. Like fly fishing, there is a lot going on – By knowing the basics you can better look at a scene and have at least a starting point on what fly to choose and what leader to use, the rest of time we are adjusting on the water as the day progresses.
At first, it is common to shoot a bunch of pictures, load them on the computer and then stare aimlessly wondering if you like the result. However, if you have a checklist memorized, you can quickly hone in on what is wrong with a picture and either make adjustments or ask higher level questions of others to help you out. Instead of asking, “do you like this picture, what would you do differently?”, you can now say, “I am having trouble with the white balance in this picture and the composition seems wrong, I think I should have used f/10 instead of f/7, maybe a shorter focal length lens, what do you think?” By thinking in this way, you can produce better quality images in less time and become more efficient at post production (i.e. waste less of your valuable time).
Here is my checklist. Neal’s 10 C’s. I initially printed this out and carried a copy in my wallet. Now I just know it by heart and I “run the list” on every shot. This is my blueprint for making on camera adjustments during a shoot.
The 10 C’s
Commitment
Composition
Color
Conversation
Coverage
Contemplation (consideration)
Convergence
Categorization
Construction
CleanCommitment – Purpose of the shot – why am I taking this picture (assignment, personal, enjoyment, educational, or just posting on a certain internet blog site). This translates to my picture quality setting – am I going to use RAW vs jpeg, small, medium, or large size? Do I need to make it count or can I just snap the shot.
Composition – Where do you want to place the subject, rule of thirds vs breaking the rules, closeup vs in the distance, on the ground looking up vs in a tree looking down, etc. Are you trying to a cover shot for a certain fly fishing magazine ;), does the editor need space for typing? Then take a few shots and look at your display, do you like the composition, what could you adjust? Take another shot and so forth.
Color – Lighting (high noon, sidelight, backlight, all light). Are your shadows deep and harsh? Do you need fill flash? Look at the histogram, are there blown pixels? Is the white balance correct? Too purple, too orange? Also, beware of shadows!!! This is the point were I slow down and look at my shadows. Did I get the main subject but neglect to see that big monster shadow on the wall? How can I overcome that with flash or diffusers or snoots or other techniques to employ or learn for the next shot.
*in just the first three C’s you can adjust the settings to achieve about 60-70% of your intended goal.
Conversation – (story). What are you trying to convey by taking the picture? Did you achieve this goal? What can you change while still standing there? Example, did you intend to take a shot of someone landing a fish full of excitement but instead you used a wide angle zoom and the subject is only a small part of the picture and their face not in view? Or did you really want to get a macro shot of that Caddis pupae but instead captured the rocks, leaves and twigs as distraction from the story?
Coverage – Depth of field (background foreground) – How does the picture look, what is in focus what is out of focus. Did you want to have a dry fly in focus but the background artistically blurry but instead got a flat picture with everything in focus? How could you change your f stop to achieve this goal? Would another lens work better? Also, here is where I ask myself about the background, is it too dark and boring or do I need to add some flash to bring out colors for effect? (side note: ever notice those really great fly tying shots in magazines where the background appears to be all black or even slightly gradient? Ask yourself how they did that and how you can do it). Pause here and ask yourself about the background, does it work or does it need adjustment.
Contemplation (consideration) – Attention – where is the action. Take time to review and think about your shot. Did you replicate your mind’s eye?
Convergence – Focus. Is your picture sharp or soft? Zoom in on the picture with your camera’s display, look at the edges, are they in focus? Do you need a tripod? Do you need to secure the camera on a branch or wall or rock? Did yo get the shakes?
Categorization – What kind of picture did you take? Did you want a horizontal instead of landscape? Was it shot in the day but better suited for a night shot? Also, do you tend to overshoot certain categories (i.e. do you have like a hundred landscape shots of a river but only one close-up of the leaves?). Do you want to broaden your categories, maybe shoot some hands, feet, running water, more detail and less overview? This is an important category for me because I find that months later it is the unusual category shots of a trip that really catch my attention and if I forget to think about that while shooting I will undoubtedly pile up on the “usual” shots.
Construction – Framing and building. What is the foundation of the picture? Did you build a solid base or was it put together in a hurry and on the verge of collapse. In other words, does it have that “perfect” feel like you knew what you were doing or does it look like you pulled out the camera and prayed that you might get something good.
Clean – Simplify. Final step for me. I always finish by asking did I manage to make this shot a simple as possible. Did I remove unneeded background distraction? Did a dog walk in the background? Do I really need that tree limb in the shot? How could I make it even more simple?
Jan 13, 2009 at 2:13 am #66573MemberHere are a few notes I’ve picked up on macro photography.
Jan 13, 2009 at 2:24 am #66574MemberSome examples I have been working on lately. Still trying to work out the lighting but getting better.
Please post more of your own work here and add to the dialog. I love looking at fly photography and seeing what others are doing.
I’ve been working with selective hue subtraction and ghosting. Not yet where I want to be but making good progress.
 Jan 13, 2009 at 2:30 am #66575
dusty montgomery
MemberNeal, that is awesome, once again! I think you need to est. a repos. of your own contributions. Hell, you may the beginnings of a book. And honestly, not blowing smoke, I would purchase a book containing all that I have seen you post over the months.
Exceptional work!
D.Jan 13, 2009 at 3:20 am #66576MemberShots of my current micro studio. I made the the background roll paper holder from 1/2″ PVC pipe from Home Depot ($2.99) and a few PVC T-connectors and Elbows (about $5). I have ordered some good quality photography paper from B&H but in a pinch you can get Doodle Paper rolls from the craft store for $1.99. The base shown here is shinny tile board (one big sheet from HD is about $13 but I had them cut it for me in smaller sections. You can easily change the base or background to suite your needs for any particular shot. The wood pieces are flags and doors I made from balsa wood with gaffers tape. There are many different setups out there but this one is portable and easily broken down to store in my closet when not in use.

 Jan 13, 2009 at 4:37 pm #66577
Anonymous
InactiveNeal,
Its obvious that you have been affected by this suffering economy.
Jan 13, 2009 at 4:48 pm #66578MemberRemember Tim, this board is frequented by many type-A’s, unlike those of us whom have the time but are simply too lazy to produce similar work.
Jan 13, 2009 at 5:03 pm #66579MemberPlease reply to this post only with comments about fly tying photography or techniques. The goal was to start a general thread on the topic for everyone to participate with their own work and advice. I started the other thread for people to make quips. The fly tying stuff is pure enjoyment; I do it in the evenings during my spare (LMAO) time. It is all about efficiency and multitasking. Tim, I do understand where you are coming from; my posts are lengthy so it looks like I spend more time than I really do.
Jan 13, 2009 at 7:17 pm #66580mick mccorcle
MemberThanks, Neal!
Jan 13, 2009 at 8:27 pm #66581MemberHOW TO SHOOT FLIES ON A BUDGET
I have received a significant amount of PMs today with some great questions. The overriding theme is cost and how-to-do-it on a budget. To be honest I hadn’t really thought about that aspect but it is a great topic to cover. I look forward to seeing others jump in here; especially with the use of soft-boxes and hot lights since I don’t usually employ those techniques in my setup.
Please post your own setup or tips and tricks you have found effective
EQUIPMENTFor this tutorial I used my Olympus Stylus 770SW waterproof point-and-shoot.
The micro studio is the same as shown above.
No flash was used.
Gear: point-and-shoot camera, a Gorilla tripod (about $10 at Office Max), a halogen hot lamp, tissue paper wrapped around the hot lamp to create a light diffuser/soft-light, a second lamp focused on the white background, the background is white poster board ($2.99 at the craft store). That’s it.
Things you need to know: get out your camera manual and learn how to set macro mode and how many macro modes you have available (more later, they are not all the same), know if you can adjust ISO and white balance (most can), and know how to set the delay timer (very important – you need to use delay to negate camera shake). You won’t be using flash (most of time it is shut off in macro mode anyway). Go to the links above to learn more.
SETUP1. Screw the micro Gorilla tripod to the base of your camera.

2. Put fly tying vise as far from the background as practically possible, about 2 feet here.
3. Take a hot light (halogen used here, it costs about $8 at Office Max). I see them at many stores. Or use whatever is available. Wrap tissue paper over the light to soften.

4. Take a second hot light and focus it on the white background, the brighter the better.
5. Adjust the camera/tripod until the fly fills the screen and/or you have the composition desired. Remember to keep the plane of the camera perpendicular to the table (i.e. not skewed from the plane of the fly).

6. Get ready to adjust the camera settings. This is the learning curve part.

7. Turn on macro mode. I use macro-s for fine detail.

8. Adjust your white balance. This is tricky! You can use auto most of the time and then post modify in PS elements etc. I usually choose “cloudy day” based on experience. Notice the difference in screen color on the LCD with the two different WB settings. Find one that works for your setting.


9. Set the delay timer to on (very important). All your pictures should be shot on delay because it allows the camera to settle before shooting which negates blur. Remember in macro mode fine details will be enhanced.

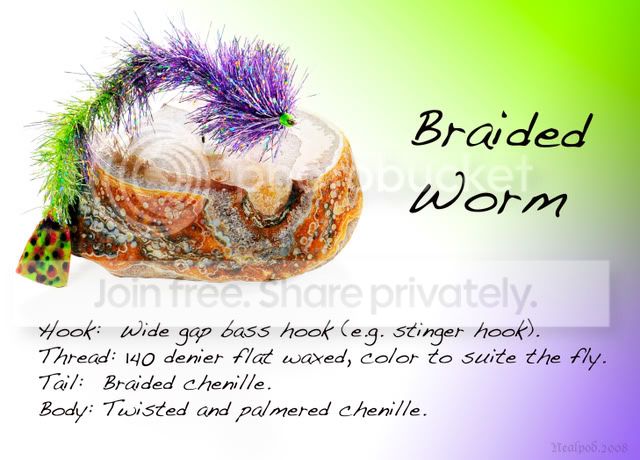
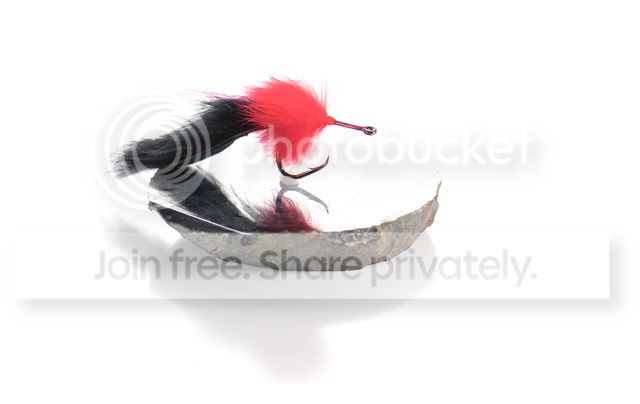
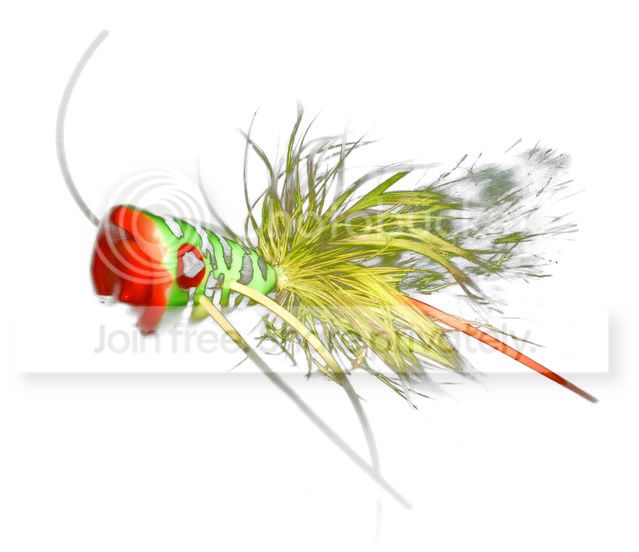
THE WINNERSElectric Chicken Boobie Fly

Blood Seaducer

Not bad for a point-and-shoot. Again, it is not the camera but the principles that create good pictures.
TROUBLESHOOTING
They don’t necessarily come out looking good. Here are some examples of bad images and what I did to correct. It’s kind of like baking – add a pinch here and there.
To much neon glow and the background is grainy. I changed the ISO from 800 to 200 and moved the light.


Better

The eyes are too dark, loss of midtones, poor detail in the middle of the fly.

I moved the light toward the front, the eyes are better lit but the fly is blown and hot.

I moved the light again and the middle is better but the eyes are too dark again, aagghh.

I changed the ISO but it was too bright.

One last adjustment and I settled on this as the final image.
Jan 13, 2009 at 8:36 pm #66582john michael white
MemberAwesome Neal!
Jan 13, 2009 at 9:33 pm #66583olle bulder
MemberHere’s the setup i use. For budget macro (and you already have a DSLR) try the close-up rings/lenses. The 2+ and 4+ will give a nice result the 10+ you can trow away :). Also for the ones shooting in RAW a greycard is very handy and gives the best collor settings, don’t have to cost a lot i use a Whibal costing 29$
Jan 13, 2009 at 9:34 pm #66584MemberAnd the result.
Jan 14, 2009 at 12:07 am #66585Eric DeWitt
MemberNomad, talk to me a little bit about your gear there – looks like you have a setup of hot lights and flashes?
Jan 14, 2009 at 3:05 pm #66586MemberEric the lights i use are normal desk lamps but with 5600K lights put into it.
In this case i tried to light the background a bit more with my flash. (did not get the desired effect by the way).For remote i use a SC-29 kabel for TTL and i have a DX-80 set to SU-4 mode and that is then triggerd wireless. Still trying for the right settings but getting there.
The lightbox is to diffuse the light. But you can also go without i recently did shoot a series of flies (80 different flies) for a webshop with just the 3 desklamps and got a fine result.
Jan 22, 2009 at 7:25 pm #66587mark s
MemberThought I would add this podcast that Martin Jorgensen did to the mix:
-
AuthorPosts
- You must be logged in to reply to this topic.