


First Attempts with a Light Tent
Blog › Forums › Photography › First Attempts with a Light Tent
- This topic has 11 replies, 8 voices, and was last updated Feb 24, 2009 at 4:14 pm by
 Ben Cochran.
-
AuthorPosts
-
Feb 22, 2009 at 4:02 pm #7940
 Cameron MortensonMember
Spent a few minutes this morning shooting photos of flies submitted for a Streamer Fly Contest on the Fiberglass Flyrodders board in my new light tent.
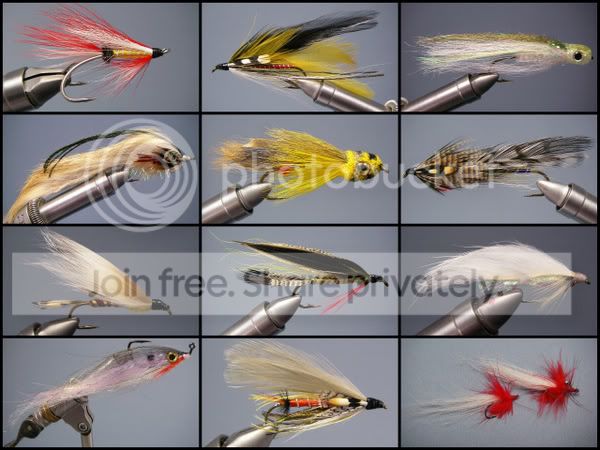
This contest was a great excuse to build a simple PVC pipe light tent and I like the results. I used my Pentax W20 in macro, freehand, without a flash. I know I’ve got a lot to learn about shooting under lights like this…but I thought the results were pretty good for first attempts.
Comments and suggestions appreciated.
Feb 22, 2009 at 5:51 pm #66734Neal Osborn
MemberGreat shots Cameron! I got your email and pictures, thanks. The originals are great on my computer and I love your PVC box setup. You are going to have a blast with this studio. Since you posted a montage of the pictures here I thought it would be appropriate to comment on this post.
I am not a professional photographer . . . but, as you know, I have spent a crazy amount of time on this particular subject of fly photography. Here are some of my thoughts based on my own trials and tribulations.
Again, strong work.
First off, why did you shoot these with the Pentax W20 instead of the Nikon D70? Seriously, the D70 is a far superior camera and these flies deserve the best equipment available. Let’s discuss that below.
Looking at the 10 C’s . . .
Commitment – you are documenting other’s work for your blog. I like what you have done, simple shots of the flies themselves with a clean background; nothing artsy. You want the flies to stand out on their own and you did a good job.
Composition/Color – Here I have some concerns. First, IMHO the flies should all face the same direction, either head-right or head-left. I am a bit distracted by having to readjust my eyes when you change composition. It would be easier to compare the flies as apples-to-apples. Second, Your background hue/saturation changes between shots from light-to-dark grey. That is a function of your camera’s metering and distance of the subject from the camera. I suspect you kept the vise at a fixed distance from the background but moved the camera closer/further from the subject on an individual basis, thus changing the dynamic of the background. You might instead consider keeping the camera at a fixed distance from the background but moving the vise to gain composition; in doing so you will retain a uniform background color and that will allow the viewer to again compare apples-to-apples. Third, you have different %’s of the vise head in each shot, try to get the same amount in each picture for clarity.
Light – I’m sure others can better comment on your hot light setup if you tell us what you have employed. One trick is to use a white card or reflector to bounce the light off the base back up to fly to give better highlights. I posted a brief how-to on this topic on Fly Art this weekend. By simply bringing a bit of light back to the front of the fly you will be able to better separate the subject from the background and give a “glow” or keylight effect to the fly. Also, I think you need an extra light on that background to brighten things up. BTW, nice white balance. Was that auto WB straight from the camera or did you apply a theme WB?
*Note* these changes are much better employed with the D70. Use a tripod if available.
Conversation – nicely done. This is clearly a montage of submitted contest pictures.
Coverage (depth of field) – With the Pentax W20 all pictures were taken at FL 6.3mm, f3.3, and between 1/50-1/80s. They look great for a point-and-shoot and honestly I am constantly amazed at the wonderful results we can get from these cameras. However, you can do much better with the D70. Try f11 with the D70 mounted on a tripod and you will be laughing at the striking difference.
Convergence/focus – The pictures are a bit soft. But then again, the D70 will make them shine.
Contemplation – The finishing move. Did you do justice to the fly tier’s art? Do they make you say Wow? I think they do and I certainly want one of each in my fly box!
I hope you find these comments helpful. Again, I am pointing out things that have helped me to overcome my own photographic challenges. I love what you are doing and it is great to see people out there making fly art. Cheers.
Feb 22, 2009 at 8:57 pm #66735Cameron MortensonMemberNeal…thank you for your comments.
Feb 23, 2009 at 5:34 am #66736 Tim AngeliMember
Cameron,
I’m really impressed with your results, especially from a simple point and shoot.
Feb 23, 2009 at 5:34 am #66737Tim AngeliMemberP.S.
Feb 23, 2009 at 9:20 am #66738 David AndersonMember
Well done Cameron – and on a PHD camera. 😮
Amazing what you can do with a bit of planning and prep work in photography.. 😉
www.dsaphoto.com
A picture is thousand words that takes less than a second while a thousand words is a picture that takes a month.
Feb 23, 2009 at 12:29 pm #66739keith b
Membernice!
I would like to see the set up you built.Feb 23, 2009 at 2:12 pm #66740krussell
MemberVery nice, I would also be interested in the set up you used.
Kim
Feb 23, 2009 at 3:09 pm #66741dusty montgomery
MemberMake that three, Cameron!
Nice Work!D.
Feb 23, 2009 at 3:31 pm #66742Cameron MortensonMemberKind words all.
Feb 23, 2009 at 6:37 pm #66743MemberI love this shot Cameron (see below). Very nice, everything comes together nicely. It is amazing what we can get from the point-and-shoots. And your comments echo what others are saying – it is common to prefer the point-and-shoots at first because they have much better macro capability compared to the kit lenses on the dSLRs.
Nice fly!
Feb 24, 2009 at 4:14 pm #66744 Ben CochranMember
Very Nice Cameron!!! You did a very good job photographing these flies and they are some great looking ties as well!
I agree with everything mentioned but thought that I would add this for you. First off, I am not a big fan of light tents but yours did return better shots than what most do. In your very last shot, of the Heddon fly, you may notice that you had a lot of fall off on the fly and the WB is off. If we were to analyze the light in your tent, the trend seems to be better light at the elevation of the jaws on the fly with much better WB. So a better solution may be to build a platform that is at the same level as the jaws and then try reshooting the Heddon fly on a sheet of white paper. If you get on the inside of the fall off range of your light sources, you will have better lighting effect and better control over the WB.
Can’t stress or agree enough with what David Anderson said about preplanning a shot! Mapping it out first does open up all kinds of opportunity!
-
AuthorPosts
- You must be logged in to reply to this topic.