


Fill Flash Outdoors – Help
Blog › Forums › Photography › Fill Flash Outdoors – Help
- This topic has 28 replies, 11 voices, and was last updated Feb 1, 2009 at 12:09 pm by
 John Bennett.
-
AuthorPosts
-
Jan 25, 2009 at 12:33 am #7913
Neal Osborn
MemberI need a bit of advice on how to get better outdoor shots using fill flash. Having spent most of my time the past year indoors at the micro level of photography, my skills on the river or lacking. As you know, the micro studio allows for a controlled environment where one has lots of time to pre-plan composition, arrangement, and lighting. However, on the river the game is much faster and requires quick thinking for adjusting all the variables. I am struggling with white balance and flash in particular. I was using P mode at first because I wanted to minimize my thinking while standing in moving water holding the DSLR. Now that I’m more comfortable outside I have gone back to manual mode, which is very helpful for exposure but the white balance remains an issue. Where to meter, etc. When I employ fill flash the images tend to turn out one dimensional and flat and also the skin tones are generally more “peachy”.
Here are some examples of what I’m talking about.
This is a shot I composed and metered in manual (then handed it to a friend for the shot). No flash was used. I liked the natural diffused light and picked the spot correctly to get a good outcome. The white balance was also set manual. The composition is off and I would have used a wider angle but I am satisfied with the color/tone/histogram.

However, these are two examples of fill flash that didn’t turn out well. I used my SB-600 flash on both. Yes, there are no shadows on my face but the rest of scene is also washed out. Admittedly, P mode and “auto” white balance. The images are flat and the white balance is way off – either orange or magenta – very difficult to correct in PS. The histogram on both images look good but the outcomes are flat and lack Pop.


Any tips would be appreciated.
Jan 25, 2009 at 1:10 am #66439Douglas Barnes
MemberThe best thing to do is put the camera on manual and the speedlight on TTL, then play with the exposure compensation dial on the flash in relationship to your camera exposure. Sometimes you need to put the flash on +1 to add a lot of fill in bright or contrasty situations (attach 1)
Jan 25, 2009 at 1:17 am #66440Member…other times you may need to dial it back just to add some color (attach 2). Most importantly, warm up your flash with a gel or filter. You can then dial your color temp to match that in your converter. You ARE shooting RAW right? Bottom line is experiment and play with it. After all we get unlimited bullets with digital now. I had to learn all this stuff and dial in my flash units with lots of notes, little signs, and transparency film.
Jan 25, 2009 at 1:31 am #66441MemberThat is very helpful, Douglas. Great pictures, I always enjoy your style. Especially the two separate examples in different lighting situations. I have a few additional questions. Do you tend to use flash gels (e.g. CTO) more than lens filters? With TTL I am comfortable with changing the flash compensation, do you also zoom the flash in certain situations to hit the face only? Also, where do you most commonly meter (e.g. spot the subject vs matrix)?
Jan 25, 2009 at 5:44 am #66442MemberNeil thanks! I’ve got quite the vault of samples being a photo geek AND a fisherman most of my life. Cheers!
Back to the point at hand on what to warm. The choice is simple really. In most cases:
>CTO on flash and no filter on lens = warm subject & cold background
>Warming filter on lens (81b) and no gel on flash = cold subject & warm background
Do some tests to decide which (CTO, straw, gold, cc, etc) gel and camera white balance combination is right for you and the situation. (Hint: a snowy or cloudy day combo will be very different from a sunset combo) Try not to overdo it and warm too much. Sure it looks good on the skin tone, but its good by blue sky.
Regarding zooming, I tend to soften the strobe for close-ups if anything. Metering; center weighted in camera TTL for fishing snapshots, mostly, and an incident (Minolta IV) for serious work.. ;~)…
Jan 25, 2009 at 7:16 am #66443 David AndersonMember
Neil,
I generally use an auto setting for daylight fill with the flash set at +1/2 and the ambient set at -1/2 – 1 full stop depending on how hard the light is.
Americans are lucky that like your rugby team 😀 your direct sunlight is softer than ousr here so you might have to experiment with settings to find what works for you.
From your samples (light looks flat) I might leave the ambient exposure alone.Using exposure compensation quickly and correctly is very important in outdoor shooting IMHO and worth getting right for your camera and lens.
I also always use a diffuser like a Stofen, to take the edge off the flash and prefer to be close to the subject and shooting wide in strong light.
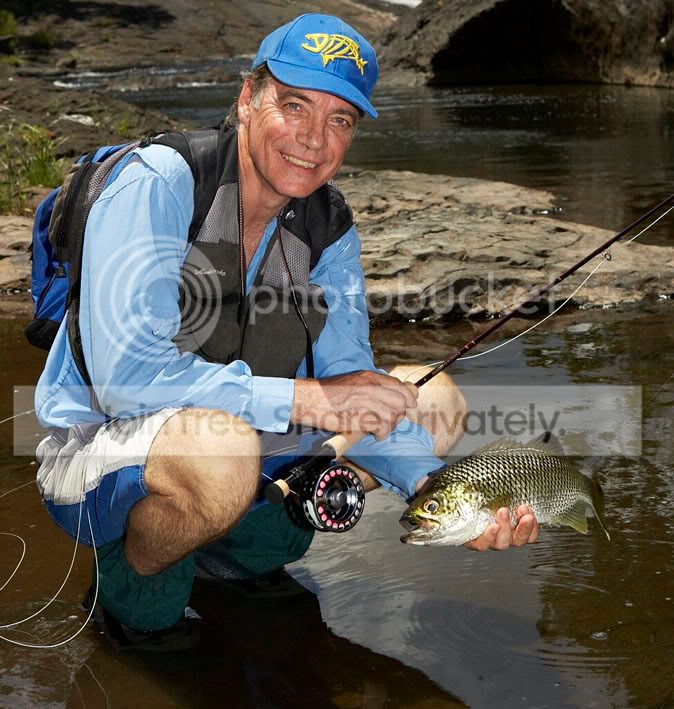
(most diffusers will warm up the flash a little)Here’s a worst case situation for fill – the angler is in full midday sun so we turned him where his face was in shadow shot very close to him with no diffusion on the flash to get max power.
The exposure is apr. 250 @ f9.5.The light from the flash is harsh, but better then full shadow or the other option of facing him into the light and having him squint and still have harsh shadows under the hat.
Here’s another example where the compensation on the flash had to be cranked up to (from memory) apr. +2 to compete with the sun and fill the white shirt out.

This is an example of everything working fairly well IMHO – the flash is enough to fill in the shadows and stand the angler out of the background a bit without looking overdone.
The background is run a bit dark to give rich color.
www.dsaphoto.com
A picture is thousand words that takes less than a second while a thousand words is a picture that takes a month.
Jan 25, 2009 at 2:23 pm #66444MemberDouglas and David –
I greatly appreciate you sharing those wonderful nuggets of information. That is exactly the kind of detailed information I needed and there is a bunch to chew on for sure. I am off to practice on the river.
Douglas – great dog shot! And thanks for the comments on mood with filter/gels. That kind of “pattern” recognition will be filed in the brain memory bank.
David – your “series” of examples are right up alley 😉 Seriously, seeing a picture with comments about the “situation” and how you compensated are extremely helpful. I often use exposure and flash compensation indoors and I have a stofen diffuser cap for my flash.
Jan 25, 2009 at 7:32 pm #66445Daryl Human
MemberGreat thread this guys!
Quick question though, I heard somewhere that if you are shooting in RAW it doesn’t matter what your WB is set as you can always change it afterwards. Is this correct and what would be the best way to do this?
Jan 28, 2009 at 5:23 am #66446David AndersonMemberAn easy question –
www.dsaphoto.com
A picture is thousand words that takes less than a second while a thousand words is a picture that takes a month.
Jan 28, 2009 at 10:45 am #66447 John BennettMember
I shoot auto 90% of the time.
What ive come to learn is that the camera is accurate outdoors, less so indoors. Its exceedingly rare that I need to adjust WB in post by more than 100. I think the most that a post correction yielded was 200. Under tough indoor lighting it can and usually is off alot.Which suits me fine as 95% of my shooting is outdoors 🙂
For indoors Im trying to get better at setting the WB myself.Jan 28, 2009 at 12:42 pm #66448MemberIf you’re out a few 100K
Another silly question – 100K = Kelvin?
Jan 28, 2009 at 1:19 pm #66449John BennettMemberYep.
Allows for more subtle control than the typical sun/cloud/tungsten/stpe settings
Jan 28, 2009 at 2:58 pm #66450MemberWhere/How would one change the Kelvin on a 20D? Is there a custom function.
Jan 30, 2009 at 12:40 am #66451txbluegill
MemberThis guy does wedding and other photography but does a good job of explaining fill shots.
Jan 30, 2009 at 2:25 am #66452anonymous
MemberHi
I think with Fill Light the first place to start is what is the character of the ambiant light you are trying to “fill” .
Jan 30, 2009 at 3:03 am #66453David AndersonMemberWhere/How would one change the Kelvin on a 20D? Is there a custom function.
Not sure how the menus work on a 20D, though if it has manual WB it should let you set the WB to ‘K’ and then set a number between apr. 2000 and 10,000
A rough guide would be that 5500K is normal daylight and more is warmer and less cooler.
If you’re going to try manual do some tests on the same picture with settings from 3000 to 9000 in intervals of 1000 and check the difference.
I normally only shoot fishing stuff in a range from about 5000 to 7000.
7000 would be for grey days and 5000 for the end of the day if it’s all getting a bit orange.
5000 can look good out in the open ocean or on the flats to get really nice blues, yet still keep a fairly normal skin-tone.
www.dsaphoto.com
A picture is thousand words that takes less than a second while a thousand words is a picture that takes a month.
Jan 30, 2009 at 3:27 am #66454MemberThanks again to everyone for the great detailed replies to this post.
Will and David, your latest comments are wonderful. Only after struggling with competing kelvin outdoors and forcing myself to shoot in manual with kelvin WB does this make sense. There is a big learning curve behind what you say but it is a wonderful world once you “begin” to harness light the way your mind’s eye wants to go.
Jan 30, 2009 at 10:53 am #66455Buzz Bryson
MemberWill’s point is extremely important.
Jan 30, 2009 at 12:33 pm #66456David AndersonMemberWhile I agree with everything Will has said about ambient light ect, I don’t agree that there’s anything wrong with the ‘studio look’ in a background.
If what you’re after is a portrait of an angler, I don’t see any problem with shooting it like a proper portrait.
IMHO your flash and how you use it, is seriously important for portrait photography.
While the nice light at the start and end of the day is beautiful, everything in the middle can be very hard assuming you want to keep taking nice shots, you need to control the ambient light and flash to get good portraits.We call them power portraits – and it’s a very common style of photography in the non-fishing magazines.
(I don’t have great fishing example of what I’m going to add here because I don’t get to fussed about fishing shots because I’m trying to get away from serious photo work and relax ;))
Here’s some basics.
First up, as Will has said, some sort of diffusion is a must – the other thing you need is an off camera cord so you can side light to create a shadow to further stand the subject out of the background.
In this first example I have a fairly boring background (BG) with a bit of nice dappled light on it – if i had shot without the flash and properly exposed the subject, the BG would have been much lighter and lost the nice light – and it’s the only point of interest.

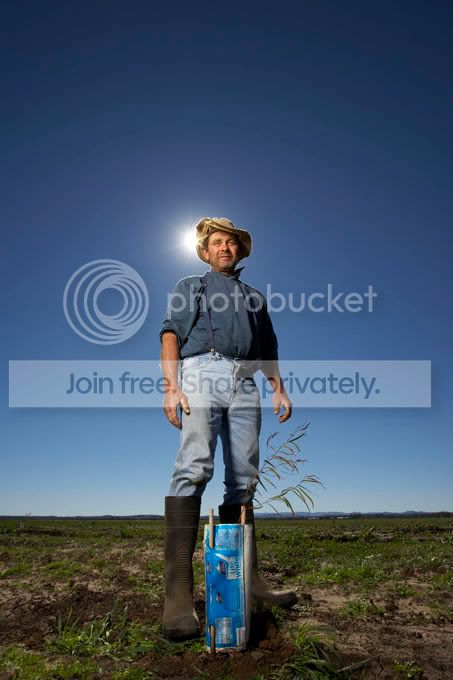
This is almost the same situation though more extreme.
I needed the shot to be about the dairy farmer and only wanted enough background to give the impression of a farm
(never mind it’s a carrot farm ;))
By again exposing for a darker background and using side flash to light the subject as opposed to ambient I get a much more powerful portrait.
Once the subject is faced away from the ambient light and in full shadow I have a range of options with how light or dark I want the background to be – here the client wanted it darker.
I would love to see a fishing mag cover lit like this one day, but am too lazy myself.. 😀

The shots above are done with proper flash so they’re cheating a bit, but you can do similar stuff with on camera flash by dropping the BG exposure with exposer compensation.
This is an example (from the film years) done with a 35mm and on camera flash and no diffusion – because the exposure between subject and BG is right the flash works ok – and better than nothing in the very hard midday light.
Because I wanted the beach as a background the subject had to be facing away from the sun and if I had just used ambient the sky would have been white and it would be hard to tell the BG was a beach.

Here’s an example of shooting into the sun – if you do this with ambient you mostly get mush and piss weak backgrounds – it works for fashion, but IMHO doesn’t work well in fishing shots.
The BG is under exposed by around a stop and a half and I’m using fairly direct flash to punch the subject out of the background, but hint at things like global warming ect ect.
If there was no flash here, it would have been very flat and there would be little if any of the color in the sky, the flash (lightly diffuesed, but on camera) also lights the rod and adds the motion.
Again, the flash makes the shot about the fisherman & the cast by allowing control over the BG.

Last example – and a good way of showing how the flash gives shape to a face and underexposure makes the BG look punchy.
The off camera shoe cord ($50.oo ish) and a diffueser is the best money you will spend on camera gear besides body and lens.

www.dsaphoto.com
A picture is thousand words that takes less than a second while a thousand words is a picture that takes a month.
Jan 30, 2009 at 2:07 pm #66457MemberDavid, DUDE.
-
AuthorPosts
- You must be logged in to reply to this topic.